In this blog post I'm going to explain how to create a .NET Core API that accepts authenticated requests from a Power App, validates the user and then makes a call into MS Graph to retrieve the appropriate data. All secured via Azure AD while using the latest (and funkiest) Microsoft.Identity.Web library for authentication and the MS Graph SDK for getting the Graph data.
If you haven't used the Microsoft.Identity.Web NuGet package yet, then I would urge you to have a look at the repo and start integrating it with your ASP.NET Core apps. The team designed this library to makes working with authentication a lot more straightforward by hiding a lot of the complexities.
I'll admit it - this is a big one... there are a few moving components and requires a bit of a setup but we will break it down to individual components to make it more "digestible". At a high level, this is what we need to do:
- Create 2 app registrations in Azure Active Directory
a) one for the client app (i.e the Power App)
b) one for the API - Write a .NET Core API that
2.1 accepts authenticated requests from clients (i.e. the Power App in this case)
2.2 makes calls to MS Graph to retrieve data - Create a Power App that calls our API to get the data
So let's get started!
1. Create the Graph Service API app registration in Azure AD
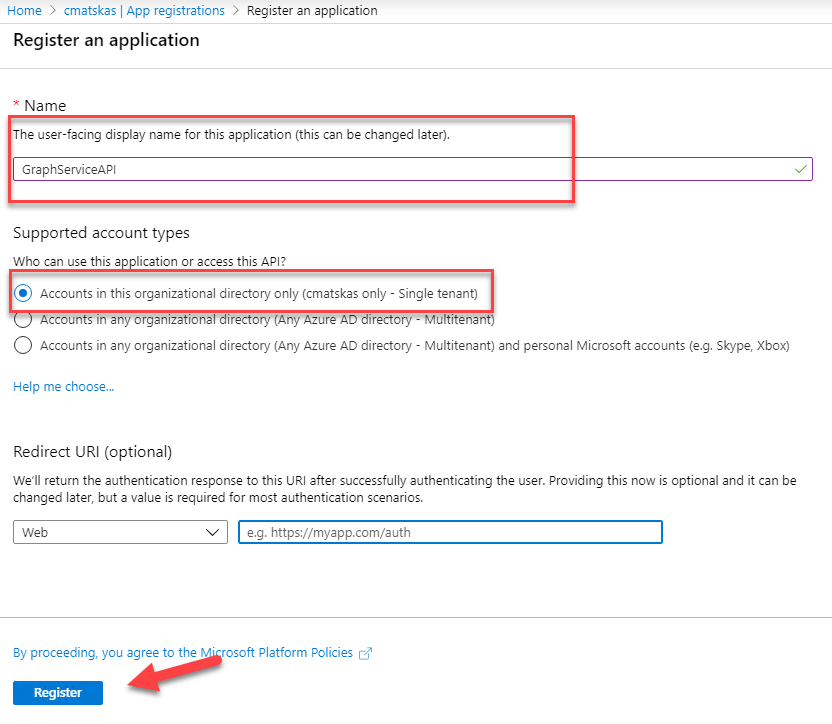
Navigate to Azure AD in App Registrations to register a new application for our ASP.NET Core Web API. The API will act as our middleware (think of it as air traffic controller) that provides access to MS Graph data.
Side note: we could have made our lives easier by calling MS Graph directly from PowerApps, as this is built-in functionality, but
a) I wanted to prove that this is possible via a custom API
b) In the future we will be adding role-based access so the PowerApp will have different access rights based on who's using it :)
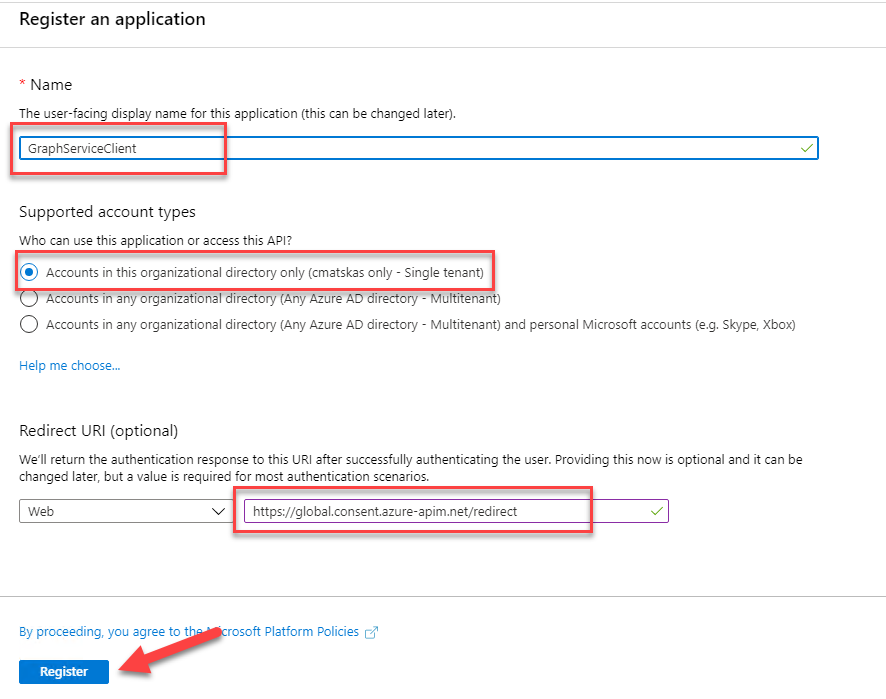
Back in the Azure portal > Azure AD resource > App Registrations, let's register a new app. Give it a meaningful Name, select the Single Tenant option and press Register. We will be coming back to configure the Redirect URI later (once we have our .NET Core API set up) but for now we can ignore this.
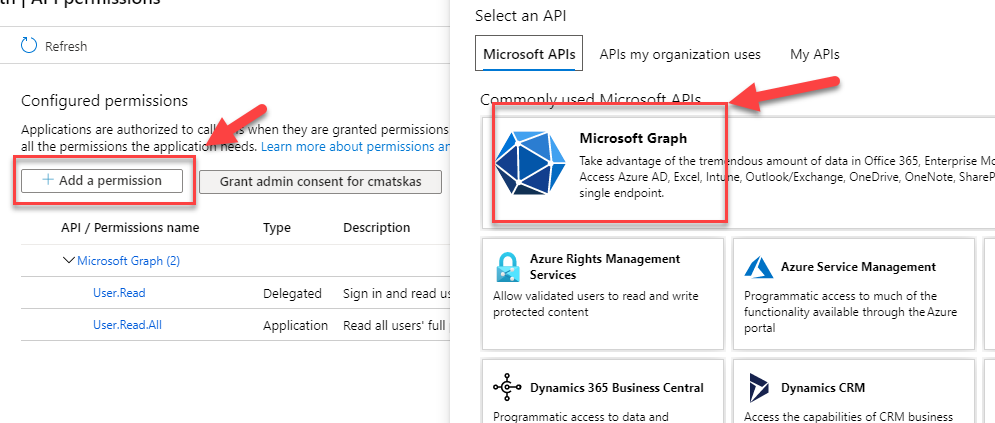
Next, we need to configure the appropriate Graph API permissions as this is the application that will be requesting the Graph data. Go to the API Permissions blade and click on the Add Permission button and select Microsoft Graph
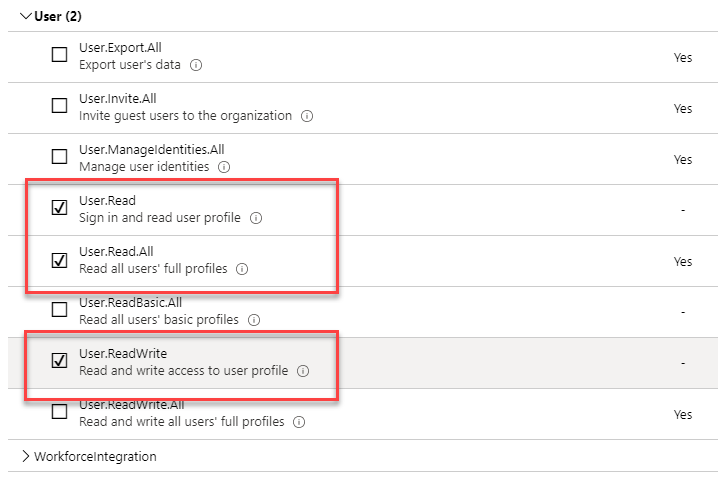
Search for User.Read to jump into the User API and select the following 3 permissions and press the Add Permissions button at the bottom of the page:
- User.Read
- User.ReadAll
- User.ReadWrite
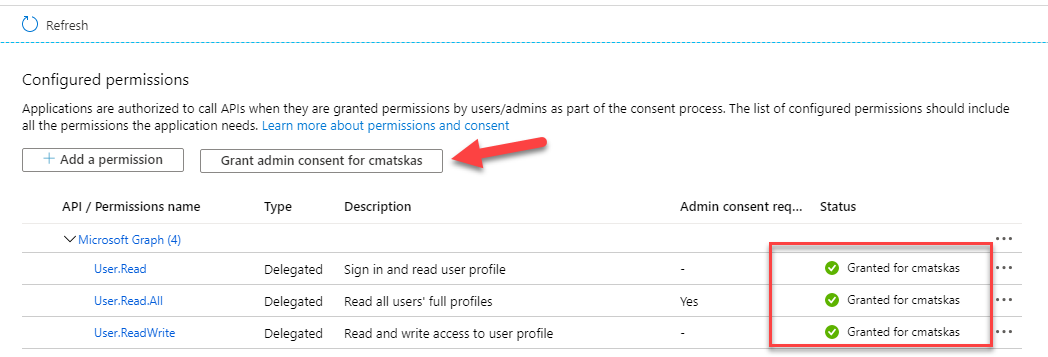
The next step is important. As you can see, One of the permissions requires Admin Consent. Since this app registration is for an API and there is no user interaction, i.e the users can't consent to permissions, we need to Grant admin consent so that the API can access the necessary data.
Up to this point, we configured an app that can access the MS Graph data. Next, we need to expose our API so that authenticated client apps can access it. To do this, navigate to the Expose an API blade and hit the Add a scope button. In the new tab that opens, provide the appropriate information as per the image below:
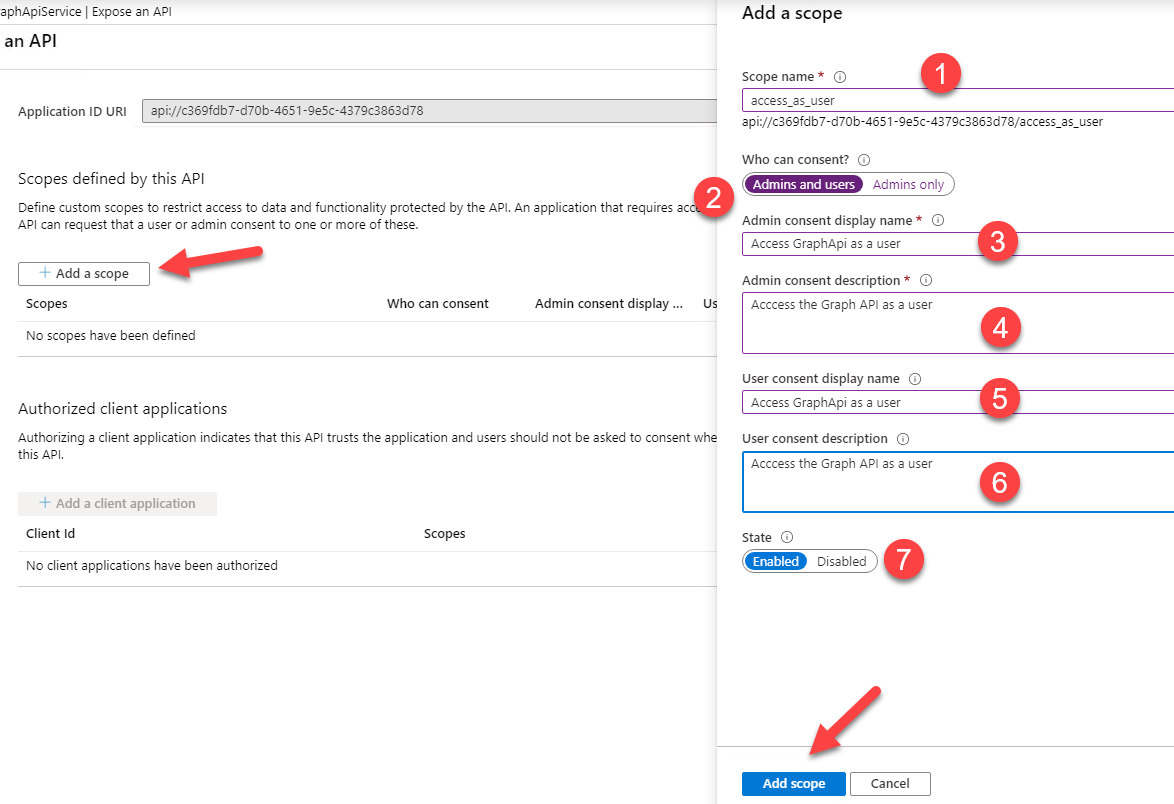
The most important bit is the access_as_user scope name. At the end, press the Add Scope button at the bottom of the page. Finally, what we need to do is configure a client secret to allow the API to authenticate against Azure AD. Navigate to the Certificates & Secrets blade and add a new client secret.
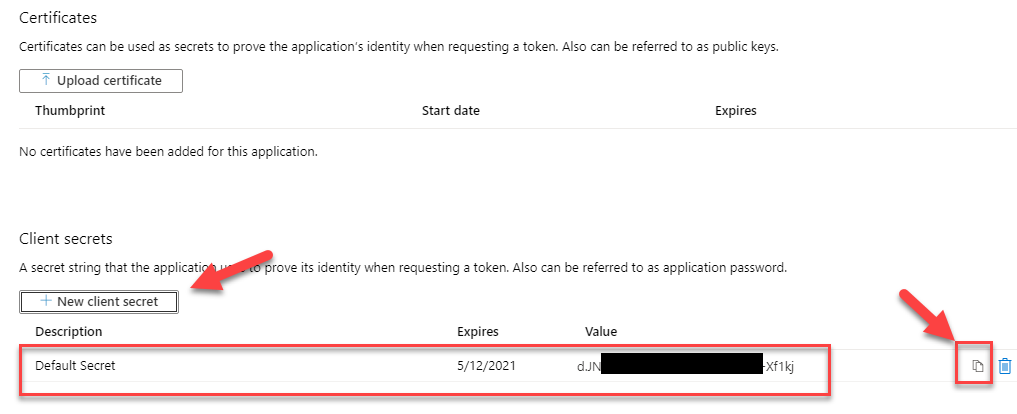
Make sure to copy the value somewhere (temporary and securely) as we will need to add it to our .NET Core Web API configuration. This concludes our Service API app registration. To recap:
- We created a new app registration
- We configured the API Permissions
- We exposed the API and created a scope
- We created a client secret to use in our .NET Core API code
2. Create the Graph Client API app registration in Azure AD
Next, we need to create an app registration for the client app. The app registration will be used by any app (in this case our Power App) to call into Azure AD to get an access token with the right permission and so that it can then pass it to our API.
In the Azure Portal > Azure AD > App Registrations, create a new registration:
One important configuration setting here the Redirect URI. Because we are using PowerApps, the Redirect URI needs to be set to:https://global.consent.azure-apim.net/redirect. Normally, this would be the Redirect URI autogenerated by your Power App Connector. However:
This is currently a temporary workaround as the PowerApps connector that uses Azure AD with OAuth2 is failing to autogenerate the redirect URI which we would otherwise be configuring here. This is currently being looked at so by the time you do it you should use the standard procedure.
Also note that you can configure multiple Redirect URIs later. This means that you can have one for your local dev environment i.e. https://localhost:<port>, one for Postman or whichever tool you like to use and one for your test/QA environment.
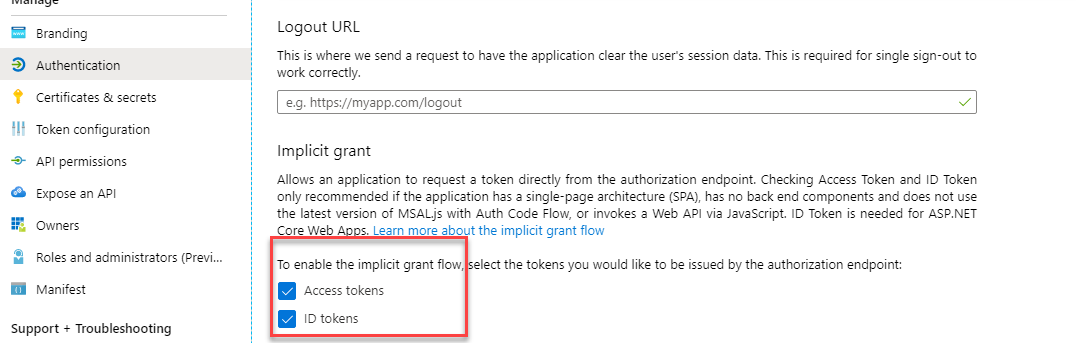
Next, we need to configure a Client Secret. use the steps from the previous app registration instructions for this. On the Authentication blade, make sure that both Access Tokens and ID Tokens are selected:
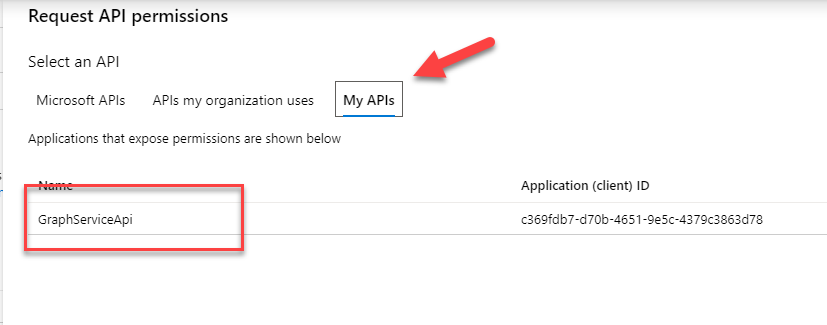
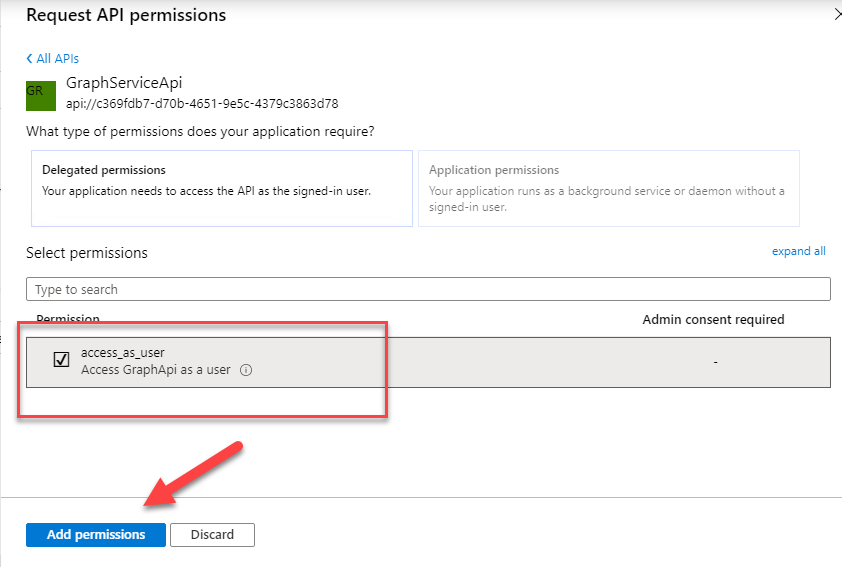
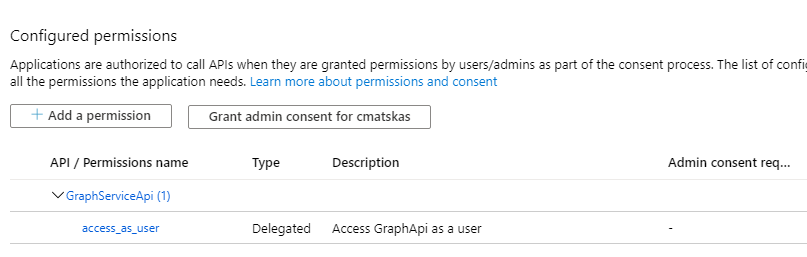
The final step is to define the appropriate permissions for our client app. Navigate to the API Permissions blade and hit the Add a permission button. Go to the My APIs selection and find the app we registered in the previous step
We now have all we need for our client app to authenticate users and return the appropriate access tokens so that users can hit our API and retrieve the Graph data. In this section:
- We created a client app to authenticate users
- We created a client secret
- We added the appropriate Redirect URI(s)
- We configure the appropriate permissions to speak to our exposed API
3. Create a protected .NET Core API to pull data from MS Graph
Time to write some code :) This bit will be fun to write as .NET Core and the new Microsoft.Identity.Web have greatly improved the overall experience when it comes to validating tokens and talking to the Graph API.
Open up Visual Studio and create a new, blank .NET Core Web API. Next we need to add 3 NuGet packages:
- Microsoft.Identity.Web (v 0.1.2-preview)
- Microsoft.Graph (v 3.5)
- Swashbuckle.AspNetCore (v 5.4.1)
With the solution created, we can now go back to our API app registration (the one we created in step 1) and configure the Redirect URL with our API URL (most likely https://localhost:5001 if you're running on Kestrel.
To configure authentication, we start with the appsettings.json file. At the top of the file, add the following json:
"AzureAd": {
    "Instance": "https://login.microsoftonline.com/",
    "ClientId": "<The app ID from the API app registration - step 1",
    "ClientSecret": "<your client secret>",
    "Domain": "<your domain e.g cmatskas.onmicrosoft.com>",
    "TenantId": "<your Azure AD tenant ID>"
  },
Next, we need to wire up the authentication in our Startup.cs. Open the file and add the following code in the ConfigureServices() method:
services.AddProtectedWebApi(Configuration)
        .AddProtectedWebApiCallsProtectedWebApi(Configuration)
        .AddInMemoryTokenCaches();
In the Configure() method, remember to add the following:
app.UseAuthentication();As you can see, with less than 4 lines of code, we've instructed our API to authenticate incoming requests and check for valid tokens AddProtectedWebApi, wire up the call to another API, i.e the GraphAPI with .AddProtectedWebApiCallsProtectedWebApi(Configuration) and configure a token cache, albeit only an in memory one in this instance.
Next we need to create an Auth provider that we can pass to the GraphServiceClient. This helper class or service, will be later injected to our controller to retrieve and return the Graph data.
This class grabs the access token for the user from the incoming request and exposes a DelegateAuthentiationProvider.
Let's go back to our Startup.cs and register this as a scoped service so that we can later inject it to our controller(s). In the ConfigureServices() method, add the following line:
services.AddScoped<GraphClientAuthProvider>();
Notice that although I would have liked for the GraphClientAuthProvider to be registered as a singleton, since this services relies on the ITokenAcquisition service which is also scoped, we need to match on the scope.
We also need to create an additional class that will provide an instance of GraphServiceClient. Add the following code to the new class:
We also need to ensure that we register this as a scoped service as it depends on the GraphClientAuthProvider. In the ConfigureServices() method, in startup.cs add the following line:
services.AddScoped<GraphClient>();Next, we can build our GraphController.cs. We are going to expose two methods:
- Get() => an HTTP GET method that returns all users in the directory
- Get(upn) => an HTTP GET method that returns a single user or
medepending on the request parameters passed
Also notice how we enforce that all requests should be authenticated using the [Authorize] attribute on the controller declaration.
NOTE: if you attempt to return raw Graph objects then you will get a serialization exception as the Graph SDK hasn't been ported to work with System.Text.Json (the default json serializer in .NET Core 3.1). You can work around it by using DTOs or configure your controller to work with Newtonsoft.Json by registering the serializer in yourStartup.csas per:services.AddControllers().AddNewtonsoftJson();
Finally, we need to wire up the Swashbuckle functionality to get the OpenAPI/swagger tools to expose the API to external consumers, including our Power App! Let's go back in our Startup.cs class and add the following code in the ConfigureServices() method:
services.AddSwaggerGen(c =>
{
    c.SwaggerDoc("v1", new OpenApiInfo { Title = "Graph Service API", Version = "v1" });
});
In the Configure() method, add the following code:
app.UseSwagger();
app.UseSwaggerUI(c =>{c.SwaggerEndpoint("/swagger/v1/swagger.json", "Graph Service API");});
This wraps the necessary steps to create an AAD protected API that calls into MS Graph. To summarize once again:
- We added 3 NuGet packages
- We configured the
appsetting.jsonfile with the AD app details - We updated the
Startup.csclass to wire up the authentication, DI and OpenAPI - We created an Auth provider for our
GraphServiceClient - We created a protected API that calls into MS Graph and returns user data
4. Test the .NET Core API
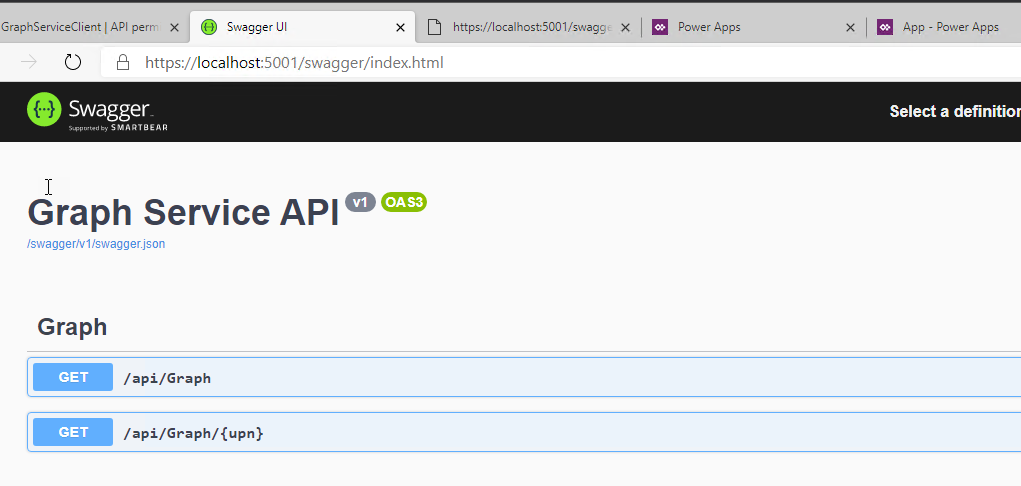
Firstly, we can spin up the API in Visual Studio and navigate to https://localhost:<portnumber>/swagger to ensure that the Open API UI and json can be accessed. This is what you should see:
This is great but so far I haven't tested the API authentication and token validation at all. To do this, I decided to use Ngrok (free service) and Postman (free tool). Ngrok allow me to spin up a proxy that exposed my localhost to the world and Postman is great for easily acquiring OAuth tokens and sending requests. If you haven't used NGrok before, register and download the tool. Unzip the executable and put it somewhere that makes sense. I went with Program Files\ngrok. I also added this directory to my PATH env variables so I can easily access ngrok from any shell. Now all we have to do to expose our API to the world is to start our API and then fire up your favorite shell and type: ngrok http https://localhost:<yourport>
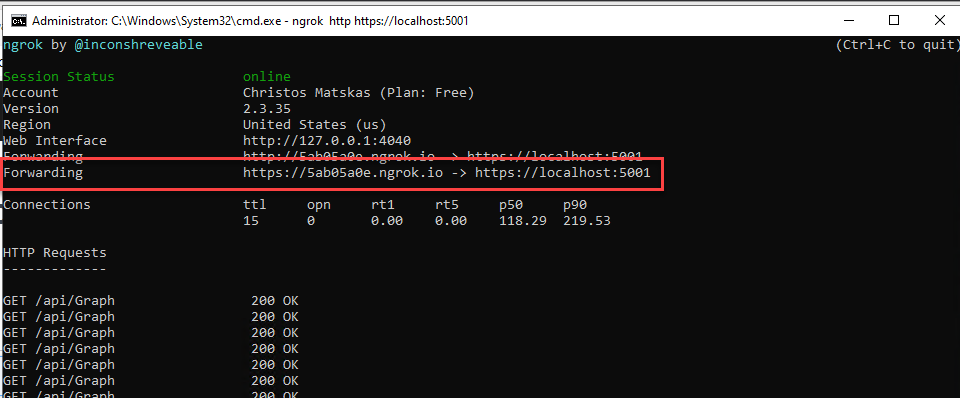
I can now access my API from anywhere by navigating to https://5ab05a0e.ngrok.io! How awesome is this?
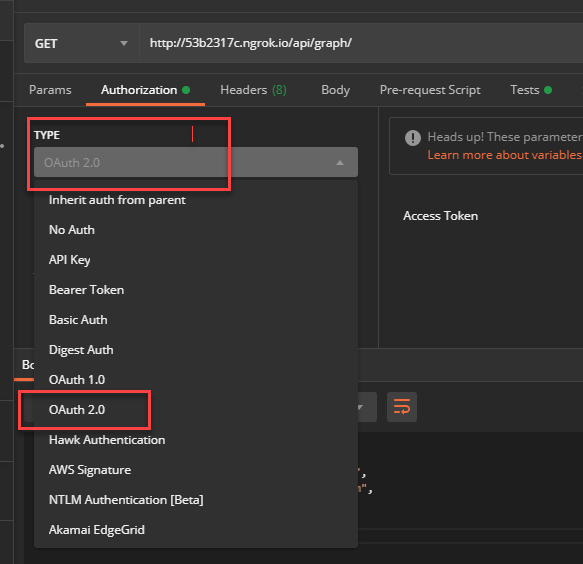
Let's fire up Postman and run some requests. Create a new request and set it to a GET with the following URL http://53b2317c.ngrok.io/api/graph.

We now need to acquire an access token. Change to the Authentication tab and select OAuth2 from the dropdown list:
We are now ready to request an access token. Click on the Get New Access Token button and fill in the appropriate fields using the details from your Client App registration we setup on step 2 with some gotchas I'll cover below
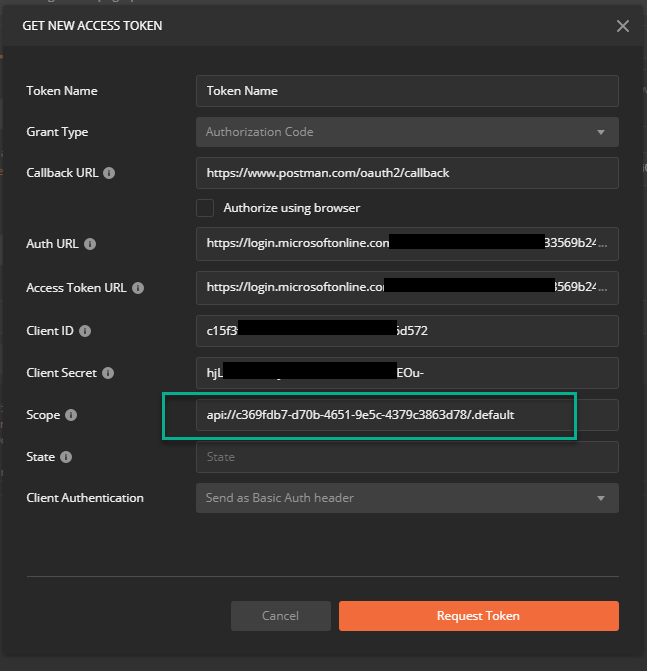
First of all, you'll notice that the Callback URL is configured for Postman so you'll need to make sure that this URL is configure in your App Registration > Authentication as one of the Redirect URLs
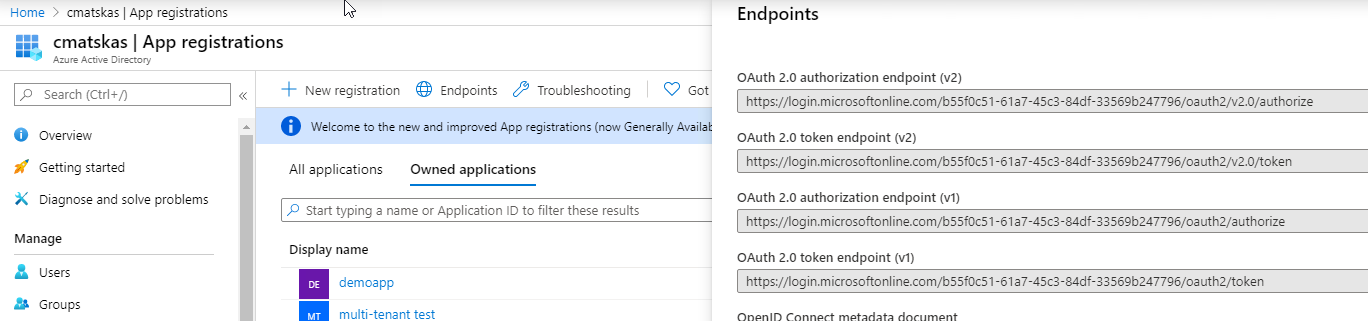
Secondly, you'll need to know your Auth URL and Access Token URLs. You can locate these in the Azure AD>App Registrations blade under Endpoints.
Finally, and this is the important bit, notice the Scope. Our client app needs to explicitly ask for this scope with all API requests. This will then be swapped by the API and the appropriate Graph scopes will be applied. We can now execute the request with the newly acquired token :)
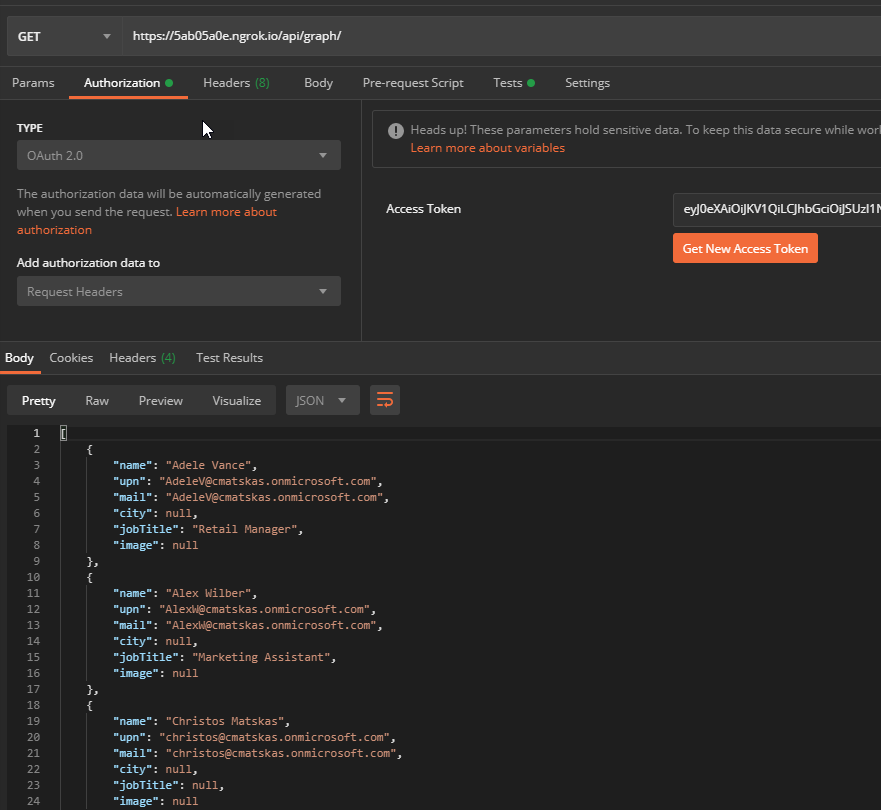
We have now tested our API and have confirmed that we can use the Client app details registered in Azure AD to acquire a token that we can then pass to the API to ask for Graph data! Next step: PowerApps FTW!
5. Create a Power App that consumes a custom API
PowerApps allows pro and citizen developers to create data driven solutions quickly and efficiently using built-in, predefined components, layouts and connectors. The platform comes with a plethora of services you can pull data from such as SQL, ServiceNow, SharePoint etc etc. But where I see the great potential is bringing the two worlds together (pro + citizen devs) to achieve even more. With custom connectors and a lot more on the way, I can now leverage datasets and custom APIs in my PowerApps in seconds. And with the deep integration of Azure AD I can have a secure solution built on top of my existing implementation.
For our example, I'm going to create a Power App that connects securely to my protected API, built with .NET Core 3.1 and pull MS Graph data. So let's get started:
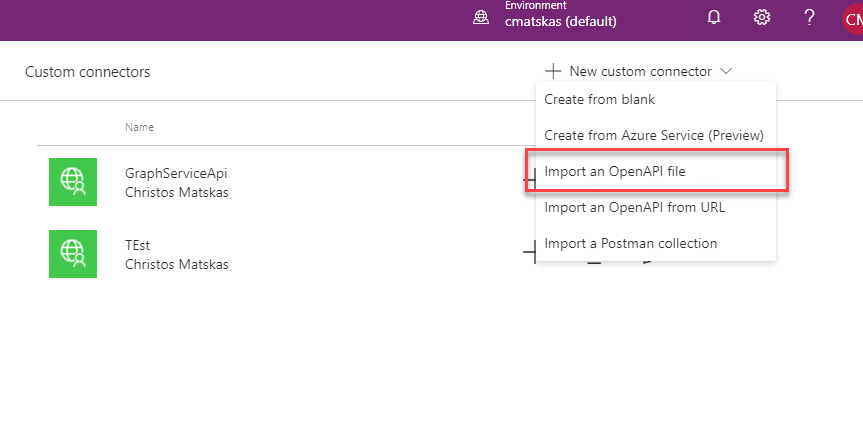
Navigate to make.powerapps.com, go to under Data>Custom Connector and select the New Custom Connector>Import and OpenAPI file
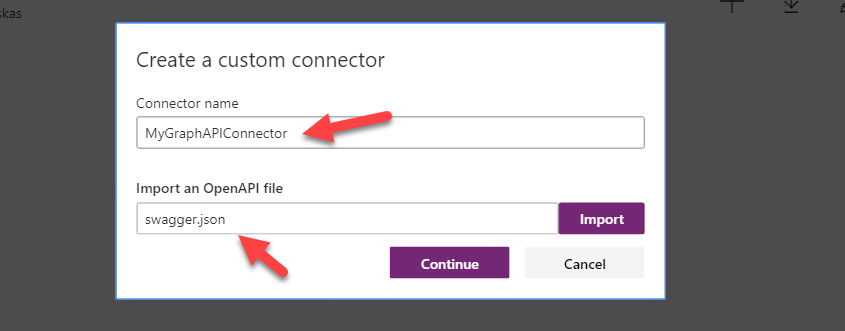
Grab the json file from you OpenAPI endpoint (like we tested at step 4) and upload it here:
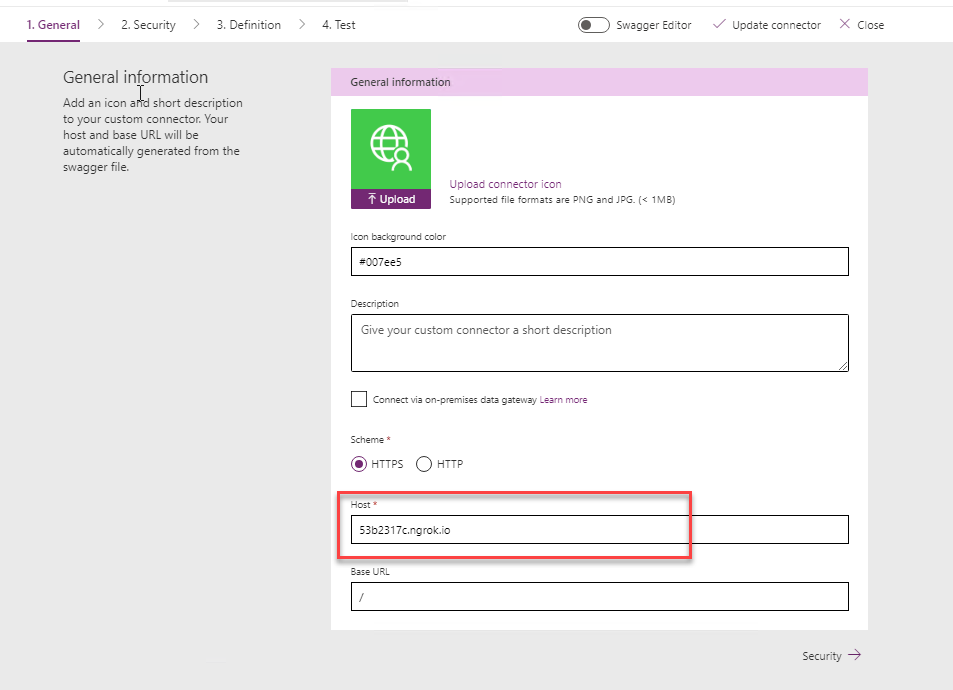
In General, you only need to provide the Host details. In our case, this is the ngrok URL as per below:
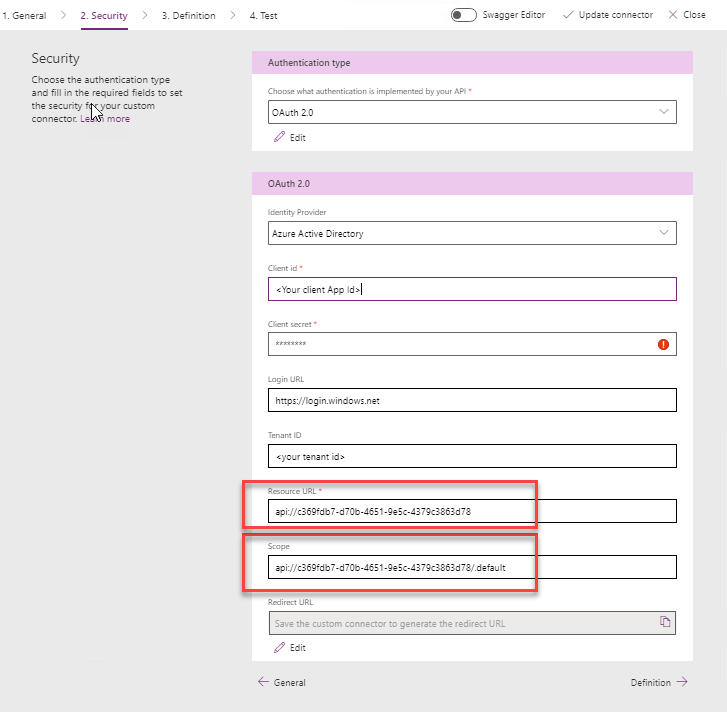
In the Security tab, we need to configure our connection.
- Authentication Type: OAuth2
- Identity Provider: Azure Active Directory
- Resource URL: the API URI (you can get this from the Expose API blade of the API app registration in the Azure AD portal)
- Scope: the API URI + /.default (e.g
api://c369fdb7-d70b-4651-9e5c-4379c3863d78/.default
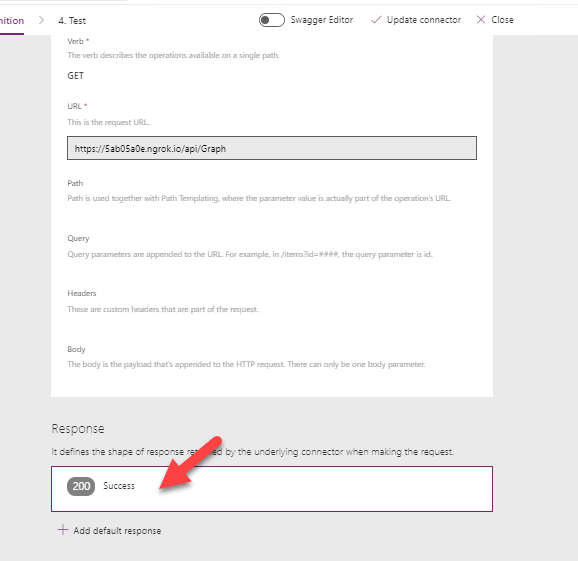
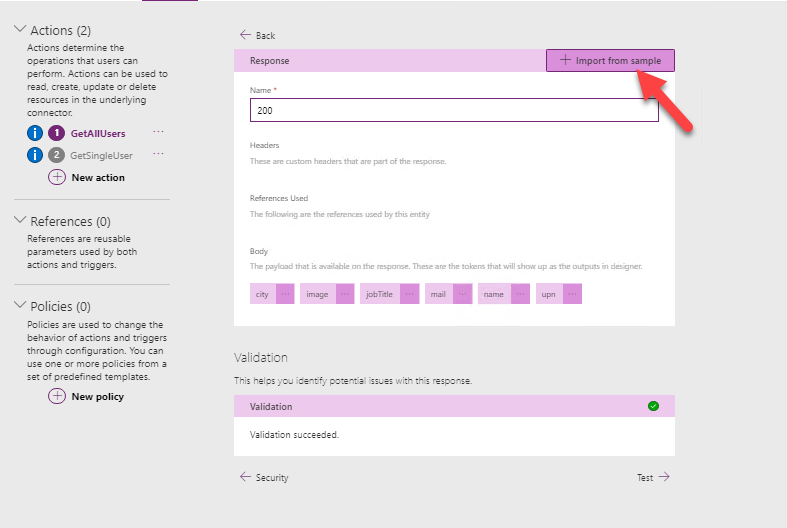
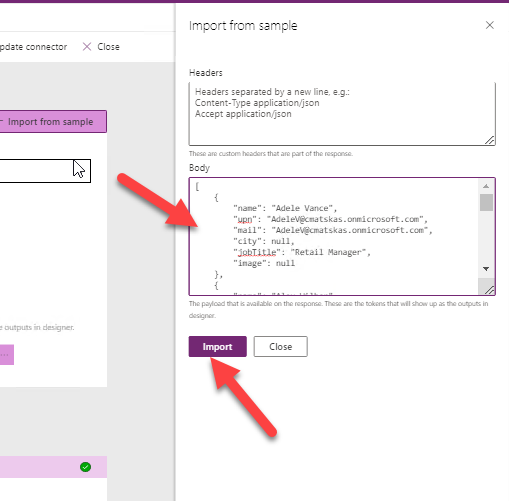
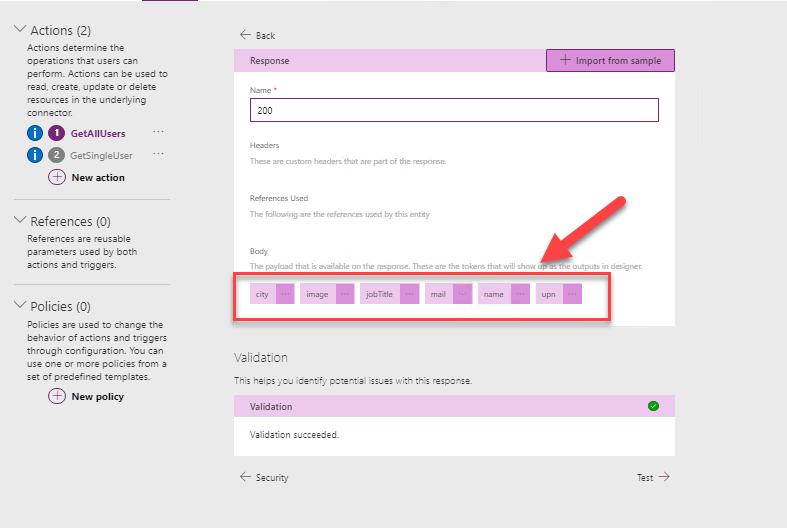
In the Definition tab, we need to do a little bit of work to configure the Response to allow our Power App to easily wire controls to the API data. To do this, grab a copy of the json output from the Get() method of our GraphController and click in the Response box to configure the expected response object
On the new tab, press the Import from Sample button:
As a last step, we need to create a new connection. Press the Update Connector at the top to save the current configuration and proceed to test the available API operations. This will ensure that our connector is working as expected. The first time you create a connection, you'll be prompted to login to your AD your tenant.
We can now create our UI. Navigate to the + Create tab and use the app template that you like the most. I chose a Canvas app from blank and I dropped a Vertical Gallery to host my Graph data. Select the whole control and configure the Data Source: Items = GraphServiceAPI.GetAllUsers().
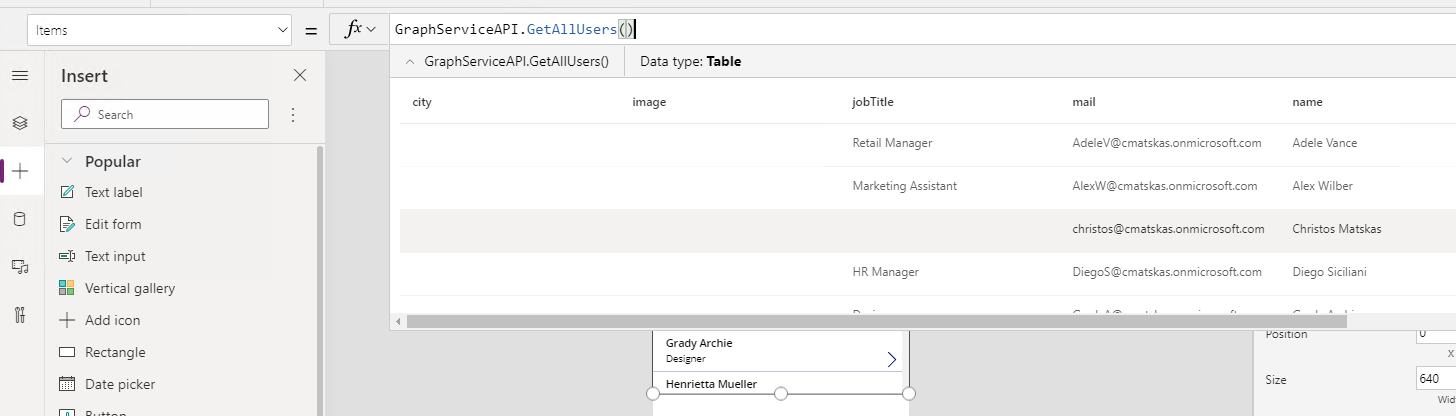
If everything worked as expected, you should be able to see your data in the dropdown! So far so good :). We now need to configure the individual controls to the Graph data. You can click on each label and either configure the value at the top bar using the: ThisItem.<property> or you can use the Properties tab on the right and configure the same value in the Text property as per below:
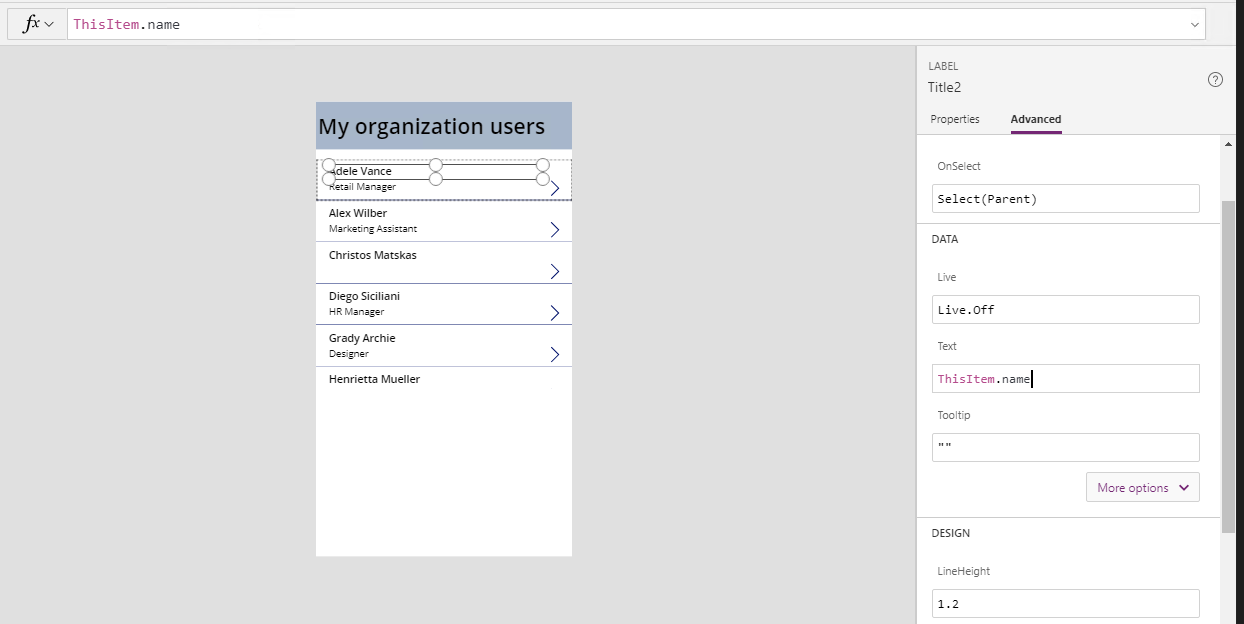
Choose the same for the second label and we now have a vertical list of all the organization users displayed on my Power App in a few steps.
By leveraging Azure AD and, Microsoft.Identity.Web and Graph SDKs, I was able to create a protected API that provides secured and controlled access to MS Graph. You can find the .NET Core API solution on GitHub ready to build and run.
Special thanks to JP and David Fowler for their guidance and help to shape the code. And thanks to Greg Hurlman for helping with the Power Apps implementation - I'm such a n00b :)
Coming next: Role-based authorization in WebAPI. We will see how we can use Azure AD role to implement authorization to the API resources so when different users work with our PowerApp, they get different access rights.