[Service Fabric](https://docs.microsoft.com/en-us/azure/" target="_blank) is Azure's highly scalable, multi-node, always-on solution that's designed to make deployment and running of distributed micro-services (and not only) a breeze. It provides a lot of features and functionality out of the box, allowing you to focus on the business value of your solution instead of the architectural and design decisions that could delay your path to production/market. There's great, impartial set of articles on micro-services published by Microsoft, along many, so if you want a crash course introduction, then I would urge you to have a read [here](https://docs.microsoft.com/en-us/azure/service-fabric/service-fabric-overview-microservices" target="_blank). This is not the one true source of documentation around micro-services but a good starting point.
Service Fabric can run on Azure, on-premises and any other infrastructure model you may choose for your solution(AWS, Google Cloud etc). It also comes with a great local development environment that allows you to deploy a 1-node or 5-node cluster for deploying and testing locally. You can choose between Linux and Windows clusters and you can deploy on bare-metal or containers. Yes, you can deploy containers straight into Service Fabric for that extra isolation and consistency.
In this instance, I will show you how to deploy an ASP.NET Core application to Service Fabric, running on my local machine. The reason why I decided to write this is because, depending on your approach, you could be totally hands off and let Visual Studio do the heavy lifting with regards to setting up your SF deployment or you could decide to be a lot more hands on and control each bit of the process. There are a few caveats, so hopefully this post will explain what needs to be done to get ASP.NET Core running on Service Fabric.
1. Install the Service Fabric Development environment
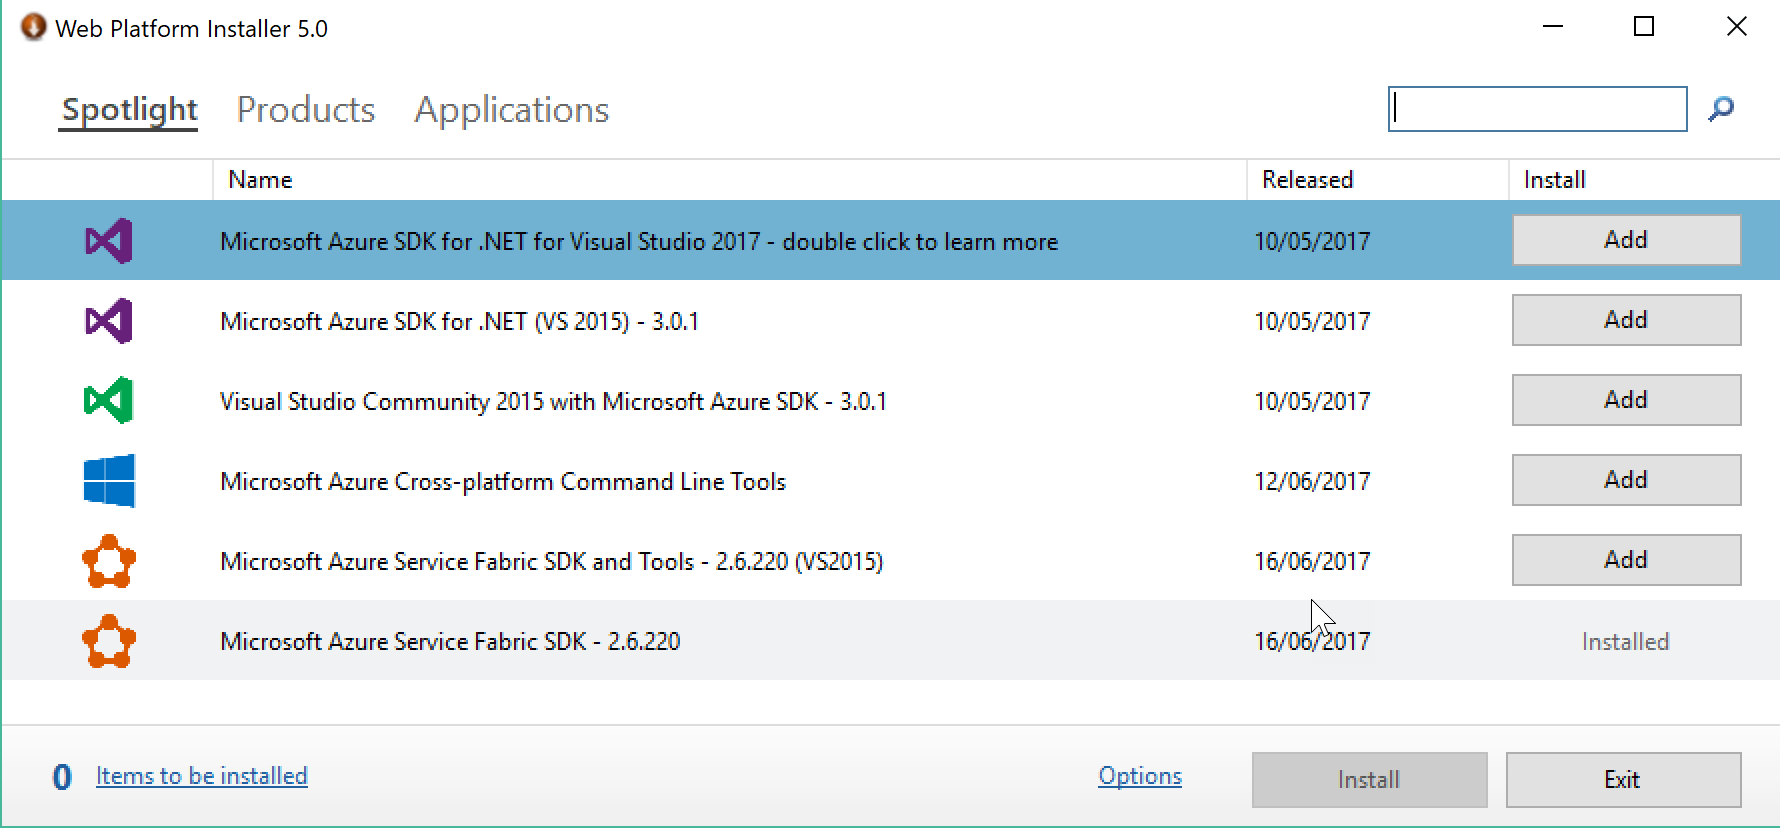
If you don't have SF installed, you'll need to download and install the SF tooling. Fire up the Microsoft Web Platform Installer and choose the Microsoft Azure Service Fabric <current version> and click on Install
Once installed, you need to configure your cluster. This steps setups the necessary directories and nodes on your local machine. To do this, head to the task bar and right-click on the Service Fabric icon and choose Start Local Cluster as per the example below:

You also get to Switch Cluster Mode from 1 to 5 nodes and Manage Local Cluster which launches the SF Web Portal.
2. Configure the ASP.NET Core app for Service Fabric (Self-Hosted)
With the cluster in place, we're now in a position to deploy an application to it. ASP.NET Core can be used in two different ways in Service Fabric:
- Hosted as a guest executable. This is primarily used to run existing ASP.NET Core applications on Service Fabric with no code changes.
- Run inside a Reliable Service. This allows better integration with the Service Fabric runtime and allows stateful ASP.NET Core services.
The first example will use the guest executable mode which means that the SF has no knowledge of the app model, other than that it's an executable that's supported by the underlying node OS. Equally, the application has no knowledge of the underlying platform i.e. the SF cluster. To deploy an ASP.NET Core as a self-hosted app we need to build the project accordingly. Assuming that in this instance we want to target a Windows SF Cluster, we need to change the application to support this. Open the *.csproj file and change it to look like this:
//...ommitted
  <PropertyGroup>
    <TargetFramework>netcoreapp1.1</TargetFramework>
    <OutputType>Exe</OutputType>
    <RuntimeIdentifiers>win10-x64</RuntimeIdentifiers>
    <PackageTargetFallback>$(PackageTargetFallback);portable-net45+win8+wp8+wpa81;</PackageTargetFallback>
  </PropertyGroup>

//...rest of code ommitted
The key points here are the fact that we expect an executable to be generated using the <OutputType>exe</OutputType> and the second one is the target runtime, defined in <RuntimeIdentifiers>win10-x64</RuntimeIdentifiers>. We now need to compile and publish our application. On the command line, type the following:
dotnet restore
dotnet publish -c release -r win10-x64
These 2 commands will download the necessary libraries required to run the self-hosted application (the framework + the application) and then publish the whole thing on the local file system. We can test the application by running the <yourprojectname>.exe from the published artefacts folder.
3. Configure the ASP.NET Core app as a reliable service to run on Service Fabric
If our application is not intended to run as self-contained app, then there are a few code changes required to allow ASP.NET Core to run on Service Fabric. The documentation for this can be found on the official [Service Fabric documentation](https://docs.microsoft.com/en-us/azure/service-fabric/service-fabric-reliable-services-communication-aspnetcore" target="_blank). Assuming that we have a standard ASP.NET Core 1.1 app that we want to deploy as a reliable service, there are a few steps necessary to achieve this:
3.1 Install the SF NuGet packages
We first need to add the following NuGet packages:
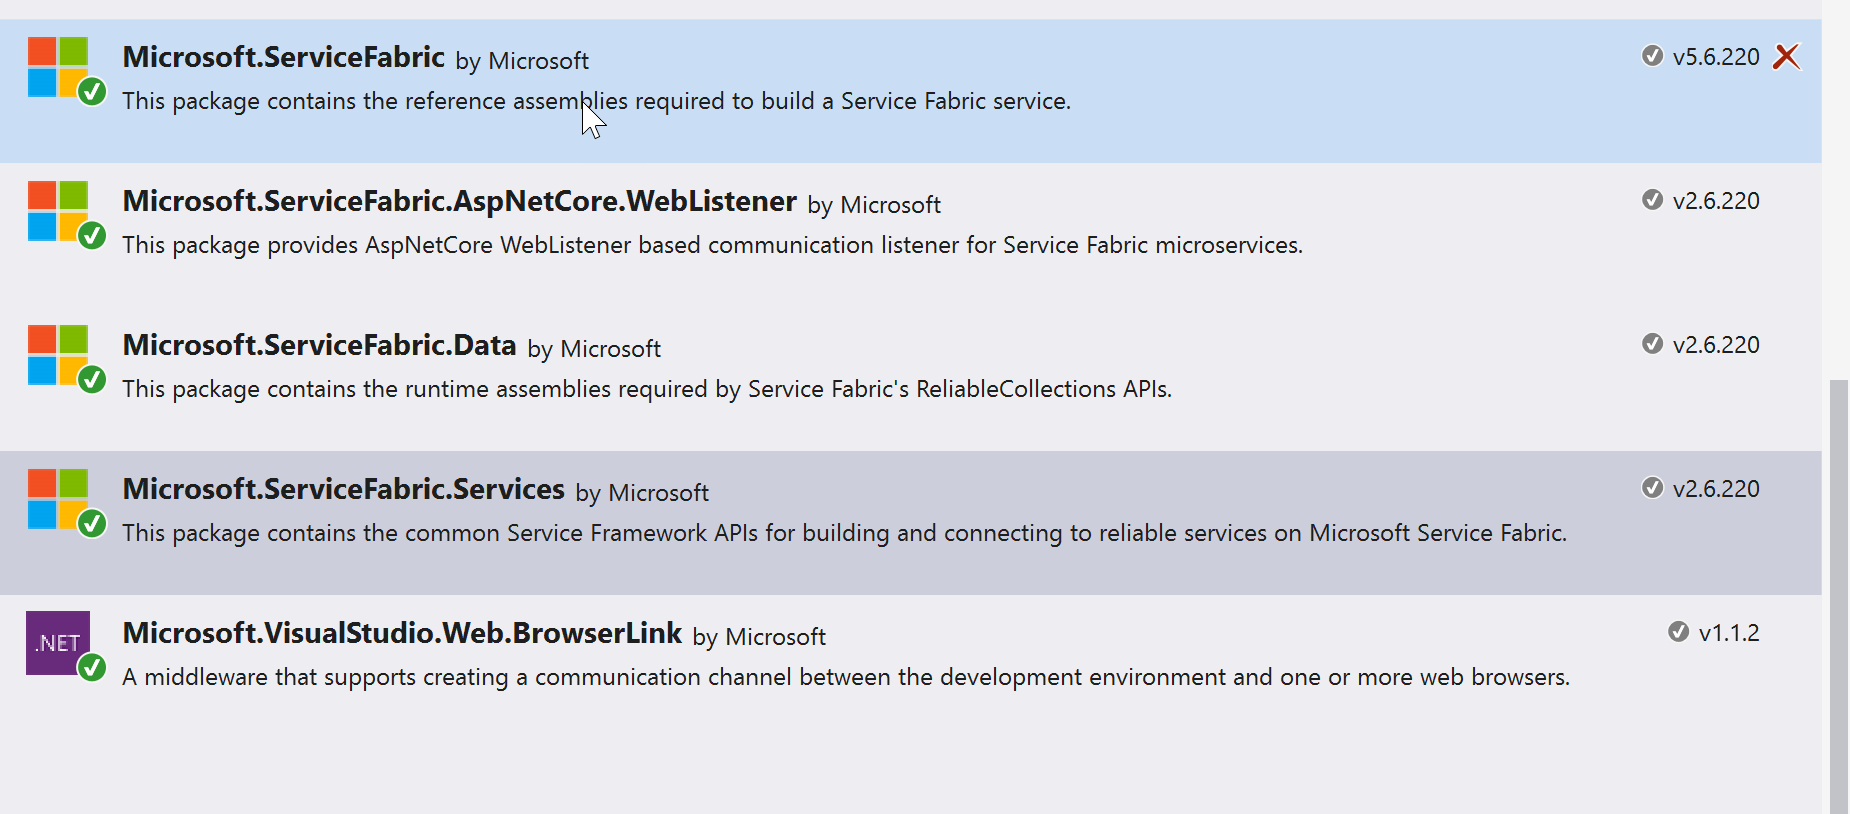
Alternatively, you can edit the ASP.NET Core csproj file directly in Visual Studio and add the NuGet packages like so:
 <PackageReference Include="Microsoft.ServiceFabric" Version="5.6.220" />
    <PackageReference Include="Microsoft.ServiceFabric.AspNetCore.WebListener" Version="2.6.220" />
    <PackageReference Include="Microsoft.ServiceFabric.Data" Version="2.6.220" />
    <PackageReference Include="Microsoft.ServiceFabric.Services" Version="2.6.220" />
3.2 Add a new application entry point for Service Fabric
The default ASP.NET Core entry point is not something that the Service Fabric an understand. Consequently, we need to add a new class to wrap up the application entry point and provide an interface that the SF API can use to bootstrap our application. New -> Class -> EntryPoint in this instance. We then need to add the following code:
We then need to modify our Main.cs class to make use of the EntryPoint class. The code to do this is attached below:
There are 2 important things to note about this code, spread across 2 lines of code
ServiceRuntime.RegisterServiceAsync("myServiceTestType",context => new EntryPoint(context)).GetAwaiter().GetResult();
ServiceEventSource.Current.ServiceTypeRegistered(Process.GetCurrentProcess().Id, typeof(EntryPoint).Name);
The myServiceTestType value needs to be passed to the ServiceManifest.xml and should match exactly otherwise our application will fail to start up.
EntryPoint, the class we created in the previous step, needs to be registered as a service because the Service Fabric runtime expects a type of class that it can understand. Everything else in our code can remain as is. We are now ready to deploy our application to the local SF cluster.
Unlike the self-contained version of our application, any Endpoint configurations we define in the ServiceManifest.xml will be honoured by the SF runtime. Consequently, if we were to use the following Endpoint definition, then we would need to navigate to localhost:8196 in order to access our ASP.NET Core site running as a reliable service :
<Resources>
    <Endpoints>
      <Endpoint Protocol="http" Name="ServiceEndpoint" Type="Input" Port="8196" />
    </Endpoints>
  </Resources>
4. Deploy to Service Fabric using Visual Studio
In order to make deployment to Azure Service Fabric easy, we can take advantage of the Service Fabric project template in Visual Studio (recommended). The SF project creates the appropriate directory structure and configures the necessary .xml files. The Service Fabric API expects a specific file structure and a couple of files to be in right place for the deployment to succeed. At a very high level, this should look like this:
C:\YourApplicationAppTypePkg
│ ApplicationManifest.xml
│
├───YourServiceServicePkg
│
│ ServiceManifest.xml
│ │
│ └───CodePkg
│ Some.exe
│ SupportingLibs.dll
│ AnyOtherScript.bat
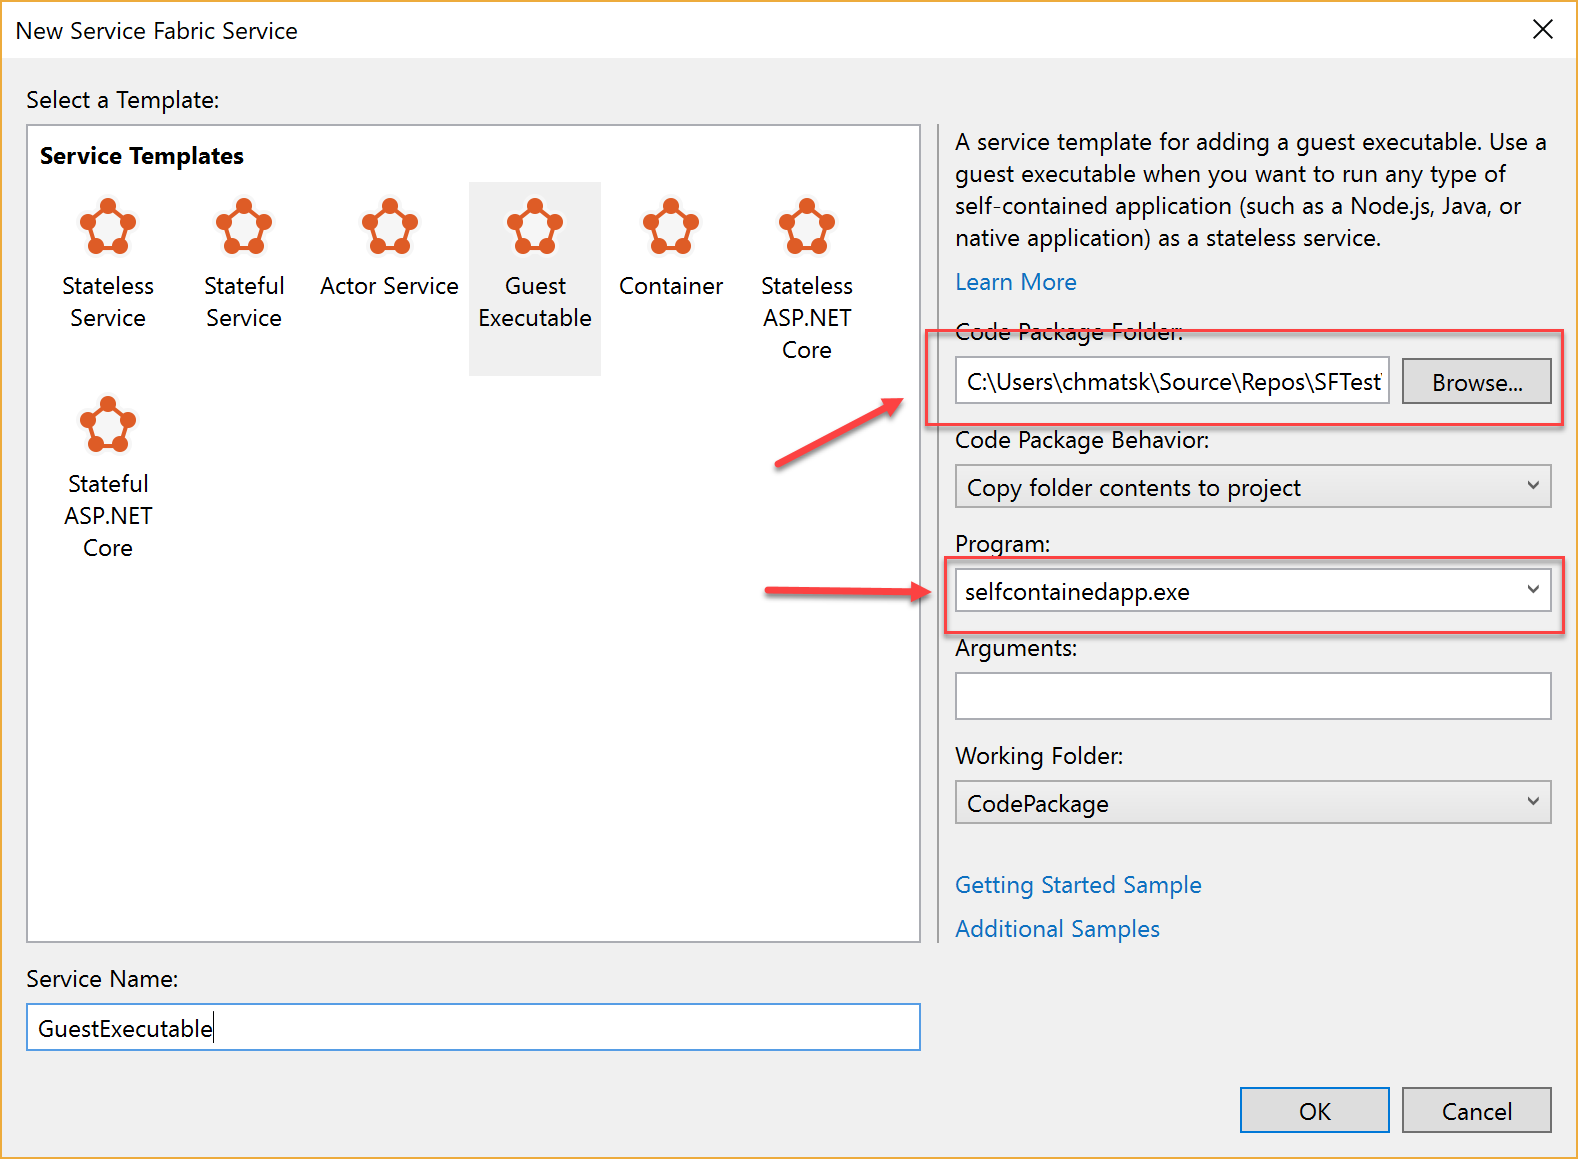
In Visual Studio, we add a new project to the solution. We need to select the New Project -> Cloud -> Service Fabric template and then choose the Guest Executable type. We finally need to configure the appropriate parameters and click on OK.
The Visual Studio SF Template creates all the necessary files for us, albeit, a bit more complex. The final structure looks like this:
│   packages.config
│   SFGuestApp.sfproj
│
├───ApplicationPackageRoot
│   │   ApplicationManifest.xml
│   │
│   └───SelfContainedSvcPkg
│       │   ServiceManifest.xml
│       │
│       ├───Code
│       │
│       └───Config
│               Settings.xml
│
├───ApplicationParameters
│       Cloud.xml
│       Local.1Node.xml
│       Local.5Node.xml
│
├───PublishProfiles
│       Cloud.xml
│       Local.1Node.xml
│       Local.5Node.xml
│
└───Scripts
        Deploy-FabricApplication.ps1
The important files are:
applicationManifest.xml: the application description for SFserviceManifest.xml: the service running inside the application. An application can have 1 or more servicesDeploy-FabricApplication.ps1: a PowerShell script to deploy our application to the SF cluster.
All the code is copied to the ApplicationPackageRoot\SelfContainedSvcPkg\Code directory and the script expects everything to be there during deployment. To deploy the code, we need to setup the SF project as the Startup Project and press F5. We can verify that the deployment was successful by navigating to http:\\localhost:5000, which is the default port of any ASP.NET Core app. We can sigh with relief onceshould see your site running.
5. Deploy to Service Fabric using PowerShell
As long as we have the appropriate Service Fabric files configured correctly, we can use the Azure PowerShell cmd-lets to deploy and manage our applications to the cluster. The config settings need to be spot on because any typos or mismatches will result to an error message. That's why the Visual Studio SF project is the preferred way for deployments, as it hides away most of the complexity. To deploy to the local SF cluster using our hand-crafted PowerShell script, we need to open our favourite PoSH editor and run the following script (ensuring first we've overwritten the appropriate parameters):
This script is admittedly simpler, but it does lack some critical logic to allow us to move from the local environment to Azure (Dev, UAT, Production). If you use the default script generated by Visual Studio, you get that logic for free. There are pros and cons with each approach.
Service Fabric is an excellent service for hosting scalable microservices while taking away much of the pain around orchestration, management and monitoring of your cluster. With features such as auto-healing, instant scalability, comprehensive tooling and APIs, it's no surprise that Service Fabric is used by Azure to run many of the services we use daily. I would be keen to hear if you've had a chance to use it and whether this post helps demystify some of the requirements for using Service Fabric with .NET Core.