In the early days of ASP.NET Core, [Kestrel](https://docs.microsoft.com/en-us/aspnet/core/fundamentals/servers/kestrel?tabs=aspnetcore2x" target="_blank) (the lightweight, open source web server) was fairly basic. And this was totally intentional! Kestrel provides a mechanism to spin up and run ASP.NET Core websites and APIs fast and efficiently with as little overhead as possible. This, combined with the other ASP.NET Core improvements (90% smaller HTTP requests etc) have contributed to ASP.NET Core's speed.
Kestrel was great at its job but in some cases proved to be very basic. It's important to understand that Kestrel was never intended to run applications in production. Instead, the recommendation was and still is to run it behind a mature and battletested web server such as IIS (if you're on Windows) or Nginx or Apache more common on Mac or Linux. These servers act as reverse proxies and provide the features missing from Kestrel, such as domain name resolution, caching, throttling, DDoS, service recovery (when a process dies for example) etc. You can read more about reverse proxies with Kestrel [here](https://docs.microsoft.com/en-us/aspnet/core/fundamentals/servers/kestrel?tabs=aspnetcore2x#when-to-use-kestrel-with-a-reverse-proxy" target="_target).
Although a reverse proxy is recommended, there are some legit scenarios when we want to run on Kestrel alone. Think of containers...Eventually, some of these missing features were added to Kestrel with subsequent releases.
In this post, we will examine the SSL capabilities of Kestrel and how to force HTTPS-only traffic even in development. This is now available without the need of a full blown web server or IIS Express to proxy the HTTP traffic.
Create a self-signed certificate to use for development
To force traffic to go over HTTPS we need to use an SSL certificate. Obviously, in production we'll use a proper certificate. I love LetsEncrypt because it's easy to use and, best of all, totally free!. If you're alarmed by the sound of free certificates, you should read [Scott Helme's](https://twitter.com/Scott_Helme/" target="_blank) (a security researcher) excellent post on [the fallacy of paid certificates](https://scotthelme.co.uk/debunking-the-fallacy-that-paid-certificates-are-better-than-free-certificates-and-other-related-nonsense/" target="_blank). However, in development we can use a self-signed certificate which needs to be issued and trusted accordingly.
The process to create a certificate requires that we jump onto the command line for a bit. There may be other ways to generate self-signed certificates but this command is by far the shortest and one optimized for developers. Ok, I admit it, the command look complex but if you follow the steps below you'll end up with a nice certificate within seconds. As a bonus, you can easily reuse it across all your dev sites running under localhost. Consequently, it's a small price to pay. We'll go through this "painful" process together...
On Windows there's a new , convenient PowerShell cmdlet (a fancy name for PowerShell commands):
New-SelfSignedCertificate. If you're curious about the various flags and options, you can check the cmdlet [documentation](https://docs.microsoft.com/en-us/powershell/module/pkiclient/new-selfsignedcertificate?view=win10-ps" target="_blank).
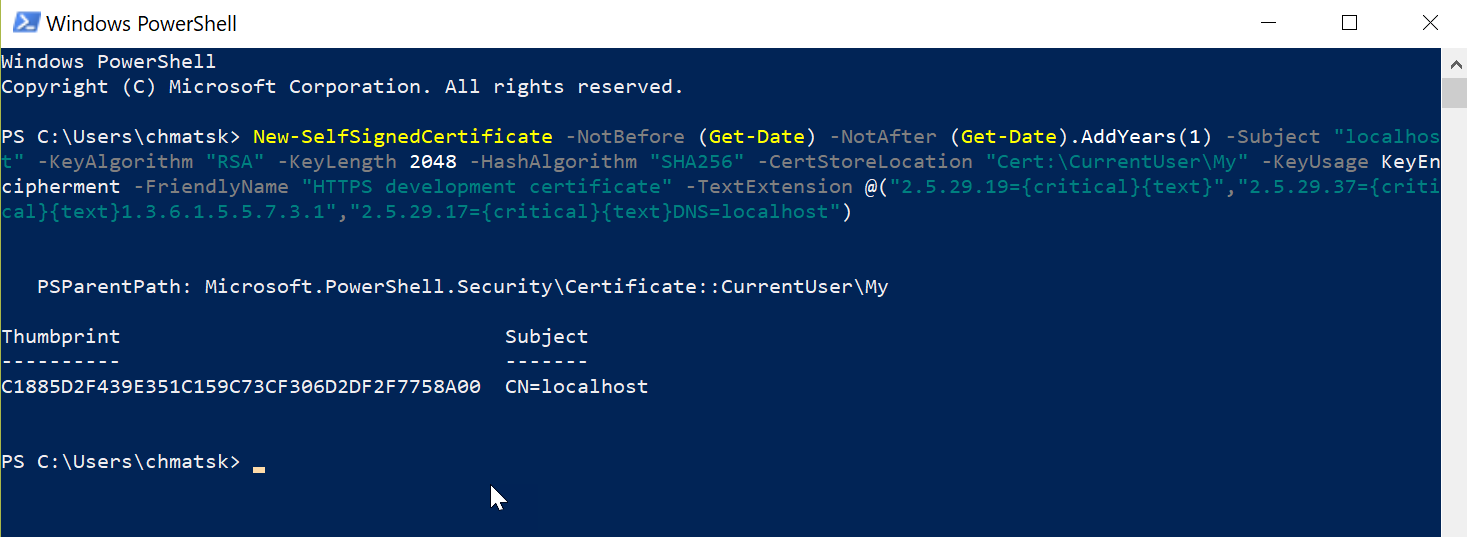
Open a PowerShell window and run the following command
New-SelfSignedCertificate -NotBefore (Get-Date) -NotAfter (Get-Date).AddYears(1) -Subject "localhost" -KeyAlgorithm "RSA" -KeyLength 2048 -HashAlgorithm "SHA256" -CertStoreLocation "Cert:\CurrentUser\My" -KeyUsage KeyEncipherment -FriendlyName "HTTPS development certificate" -TextExtension @("2.5.29.19={critical}{text}","2.5.29.37={critical}{text}1.3.6.1.5.5.7.3.1","2.5.29.17={critical}{text}DNS=localhost")
This command creates a certificate for the localhost domain - the one we're interested - and install it under the Certificates\Personal store.
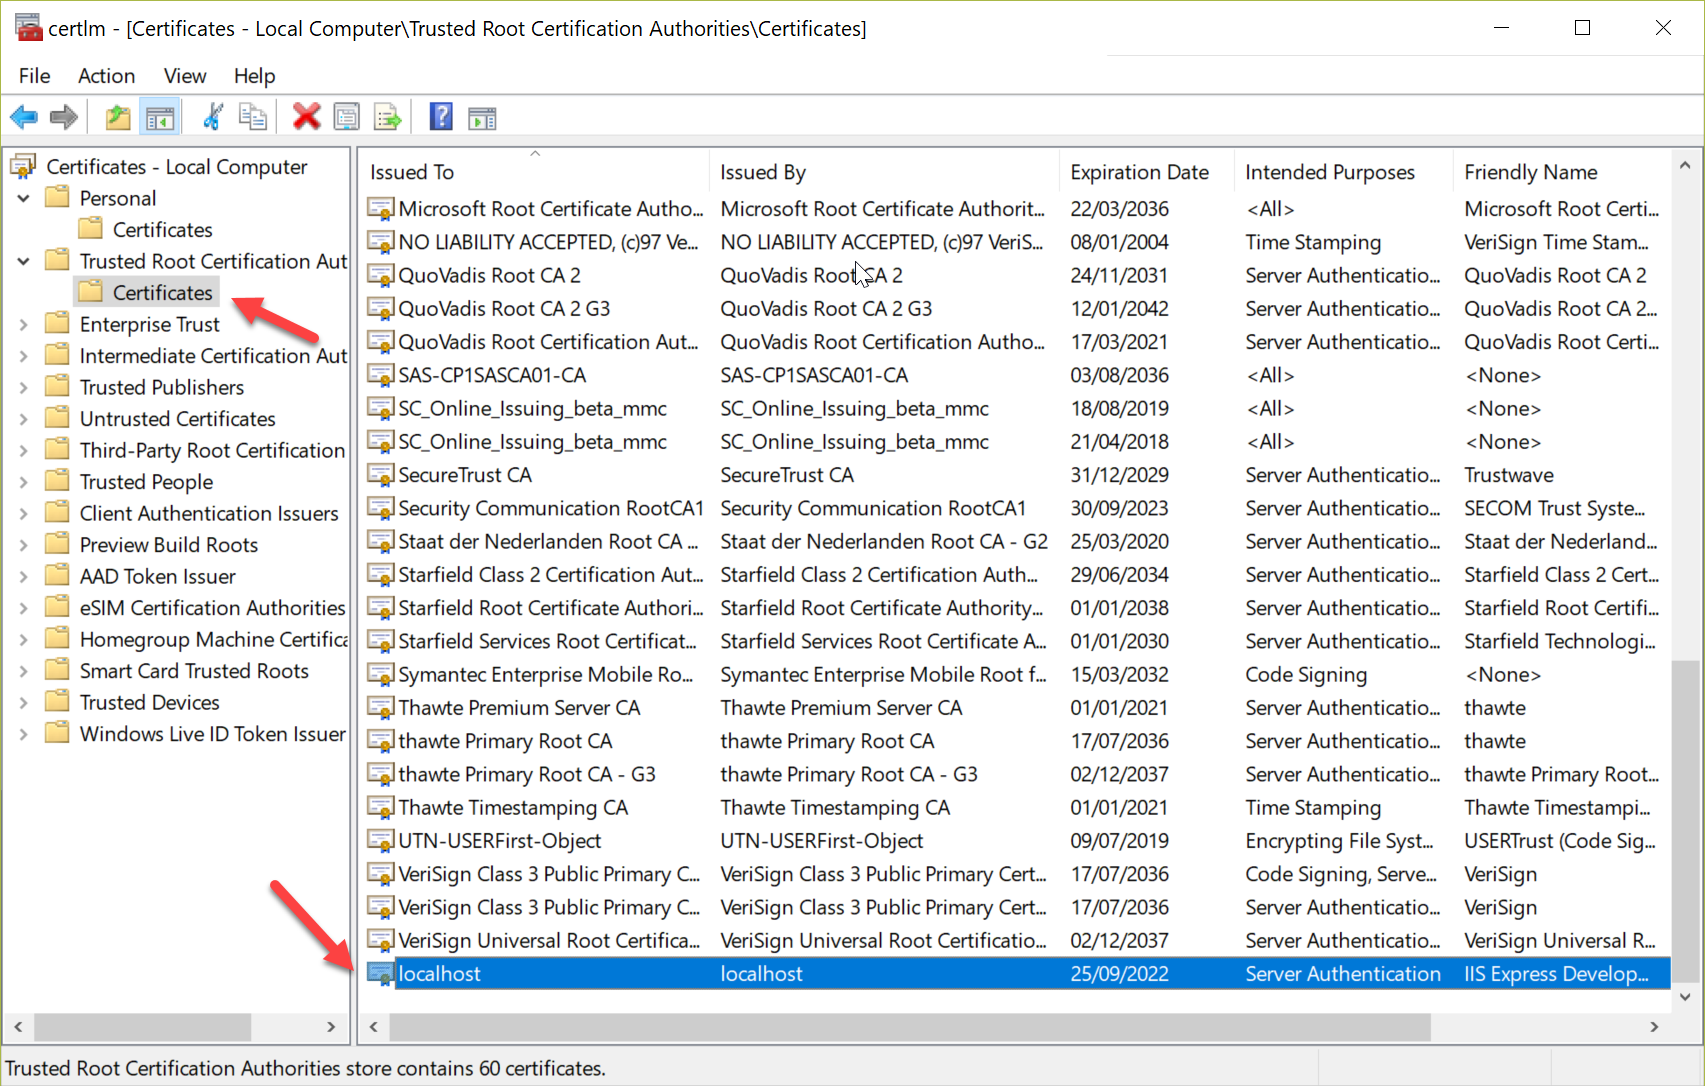
What we want to do next is copy to the Trusted Root Certification Authorities. This will stop the browsers throwing the "Untrusted Certificate" error.
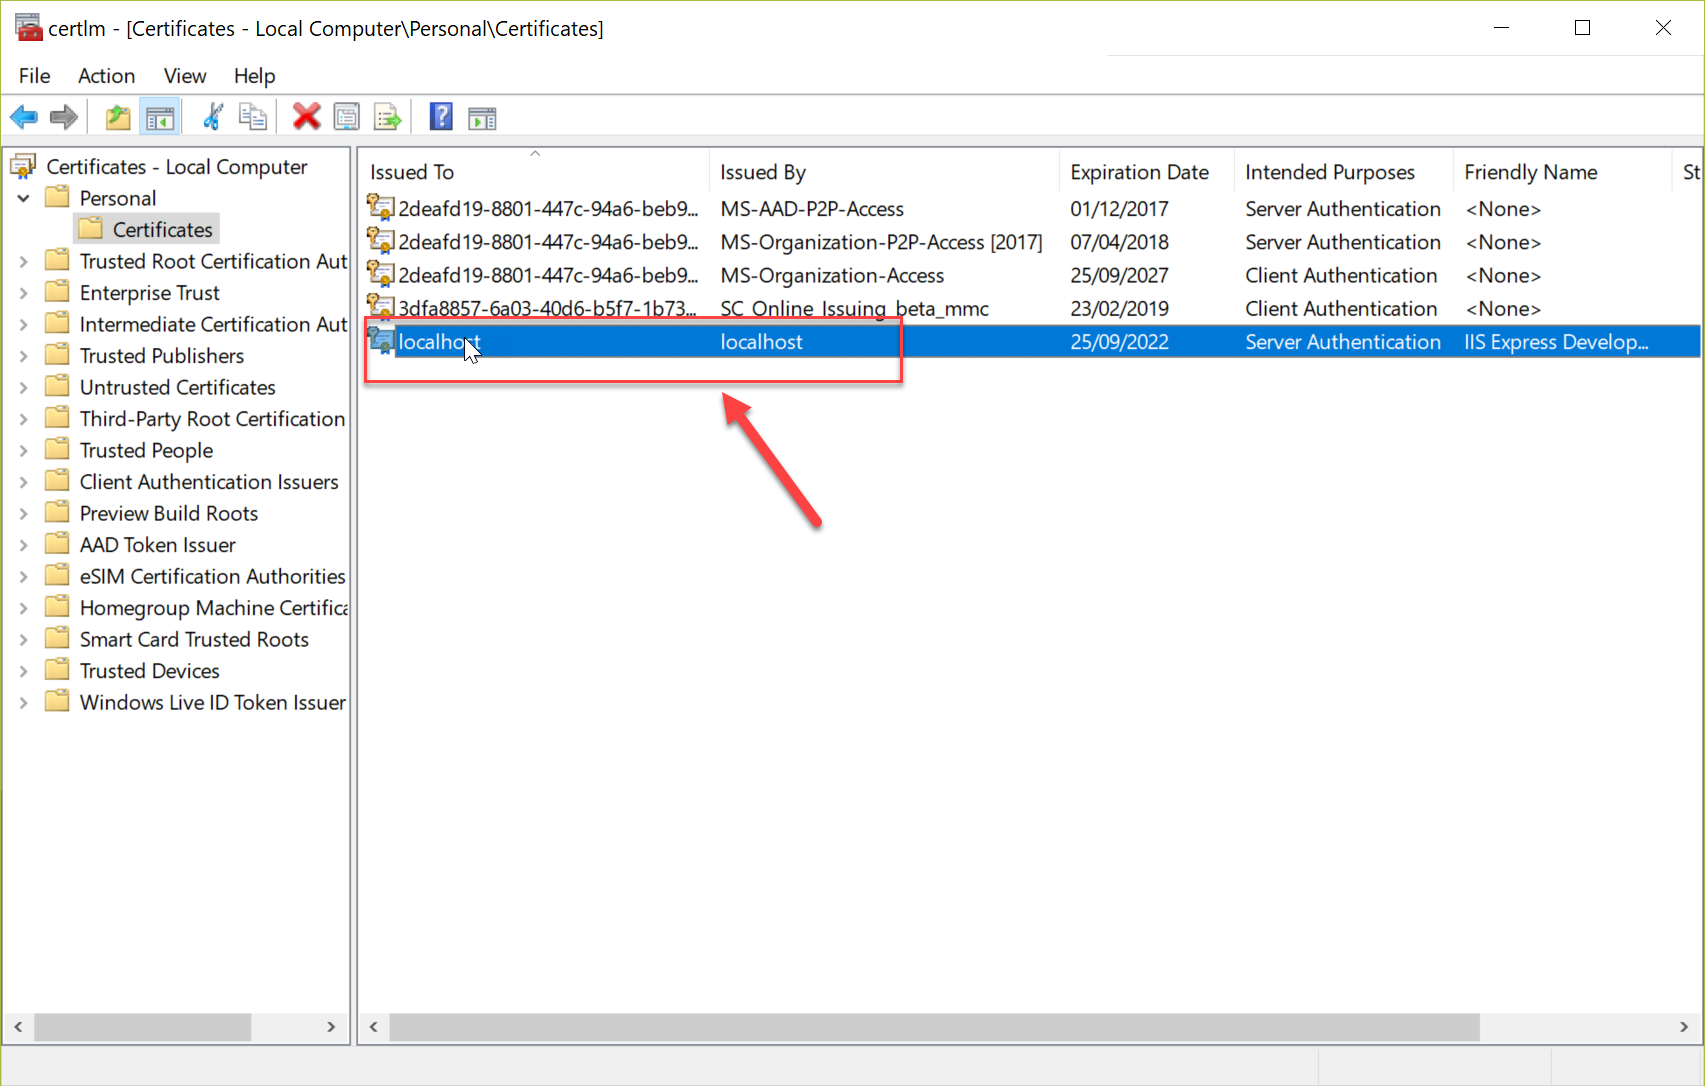
Press the (Windows) key and type certificate...This should present you with a few options. We want the Manage User Certificates option

Right-click on the localhost certificate and choose Copy. Then select the Trusted Root Certificate Authorities -> Certificates and right-click paste.
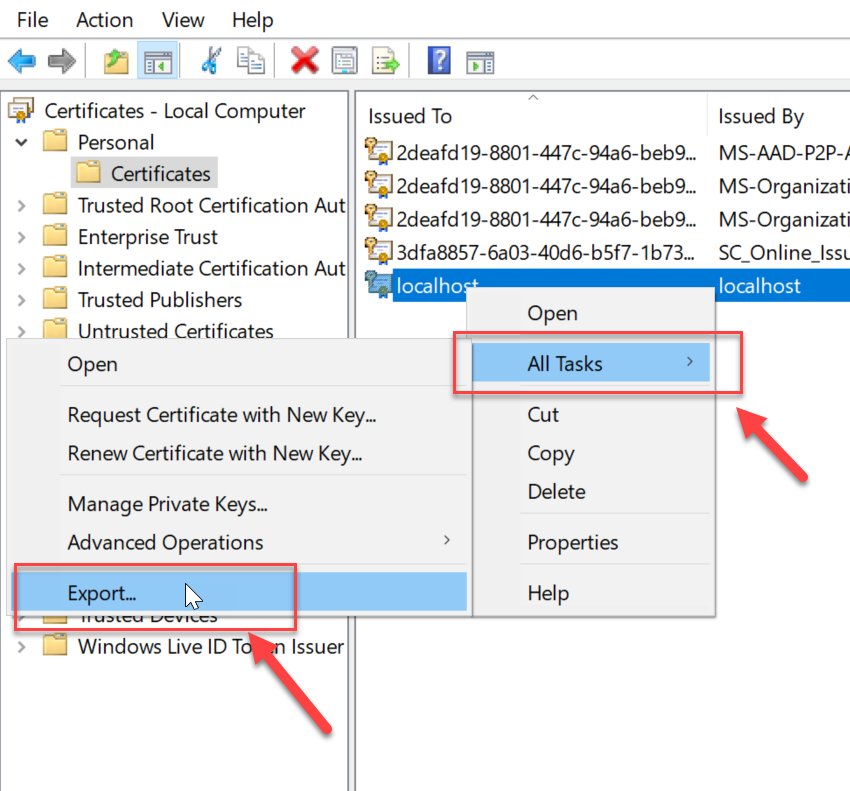
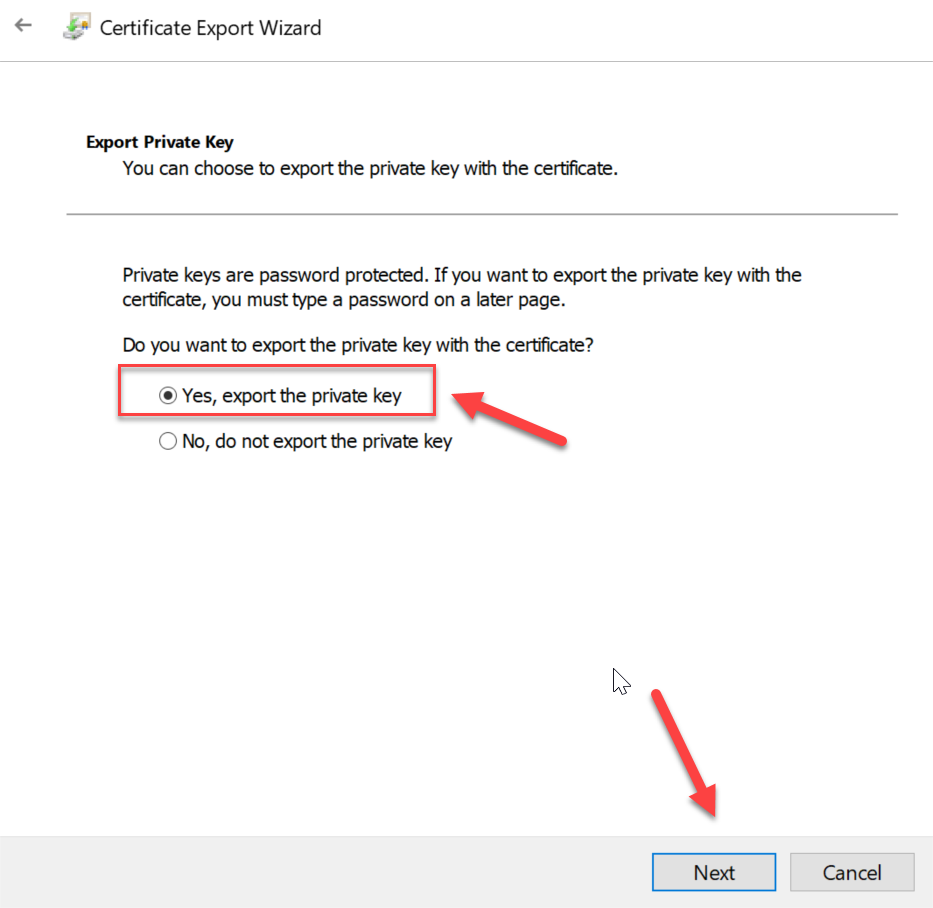
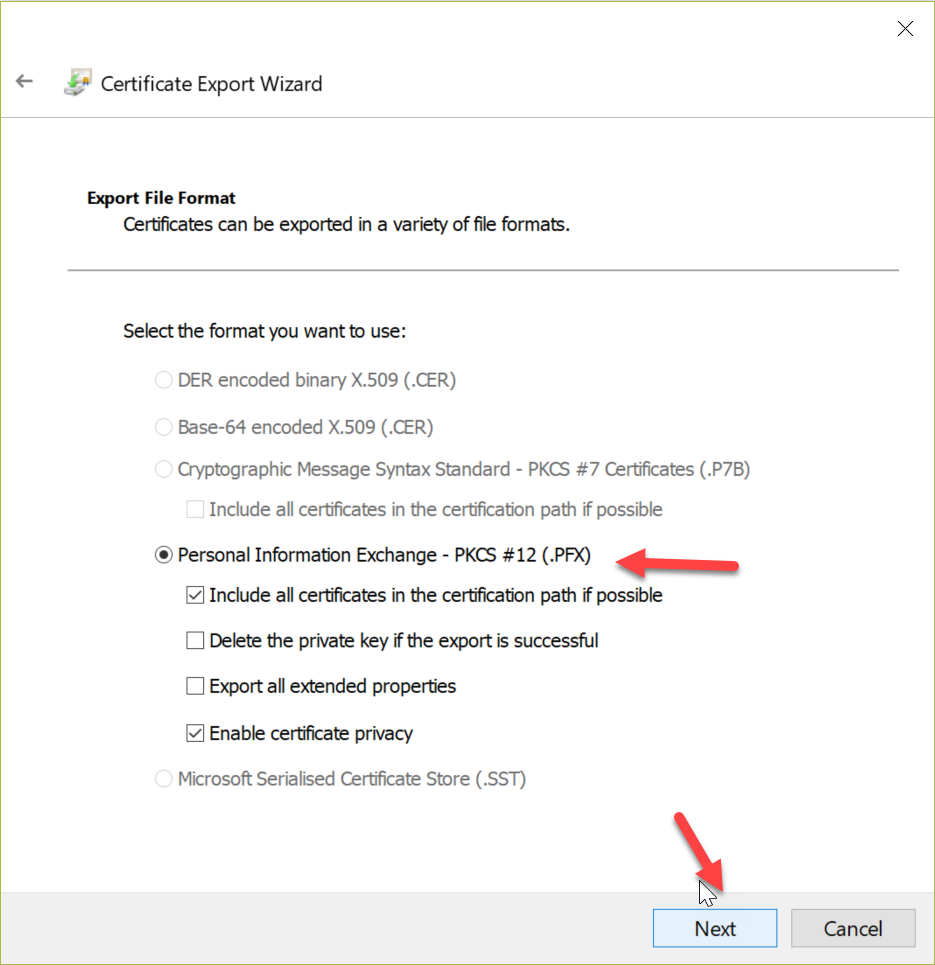
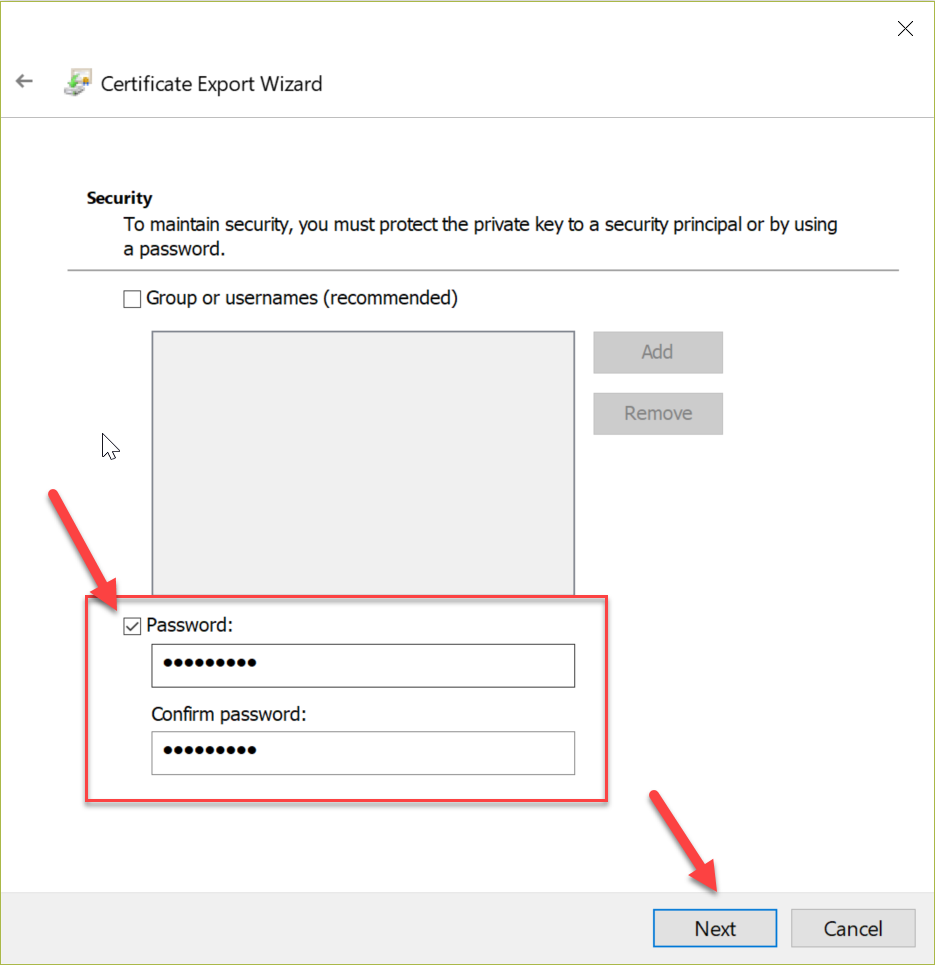
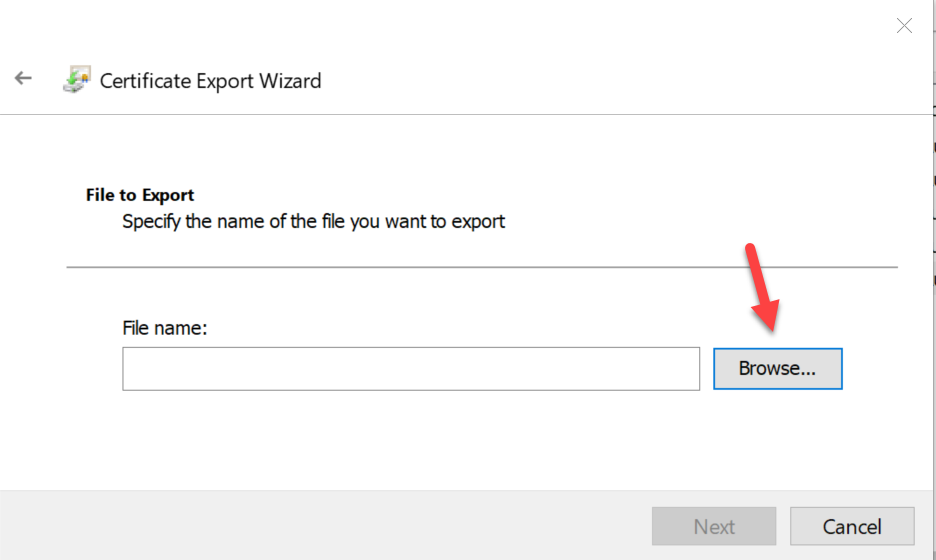
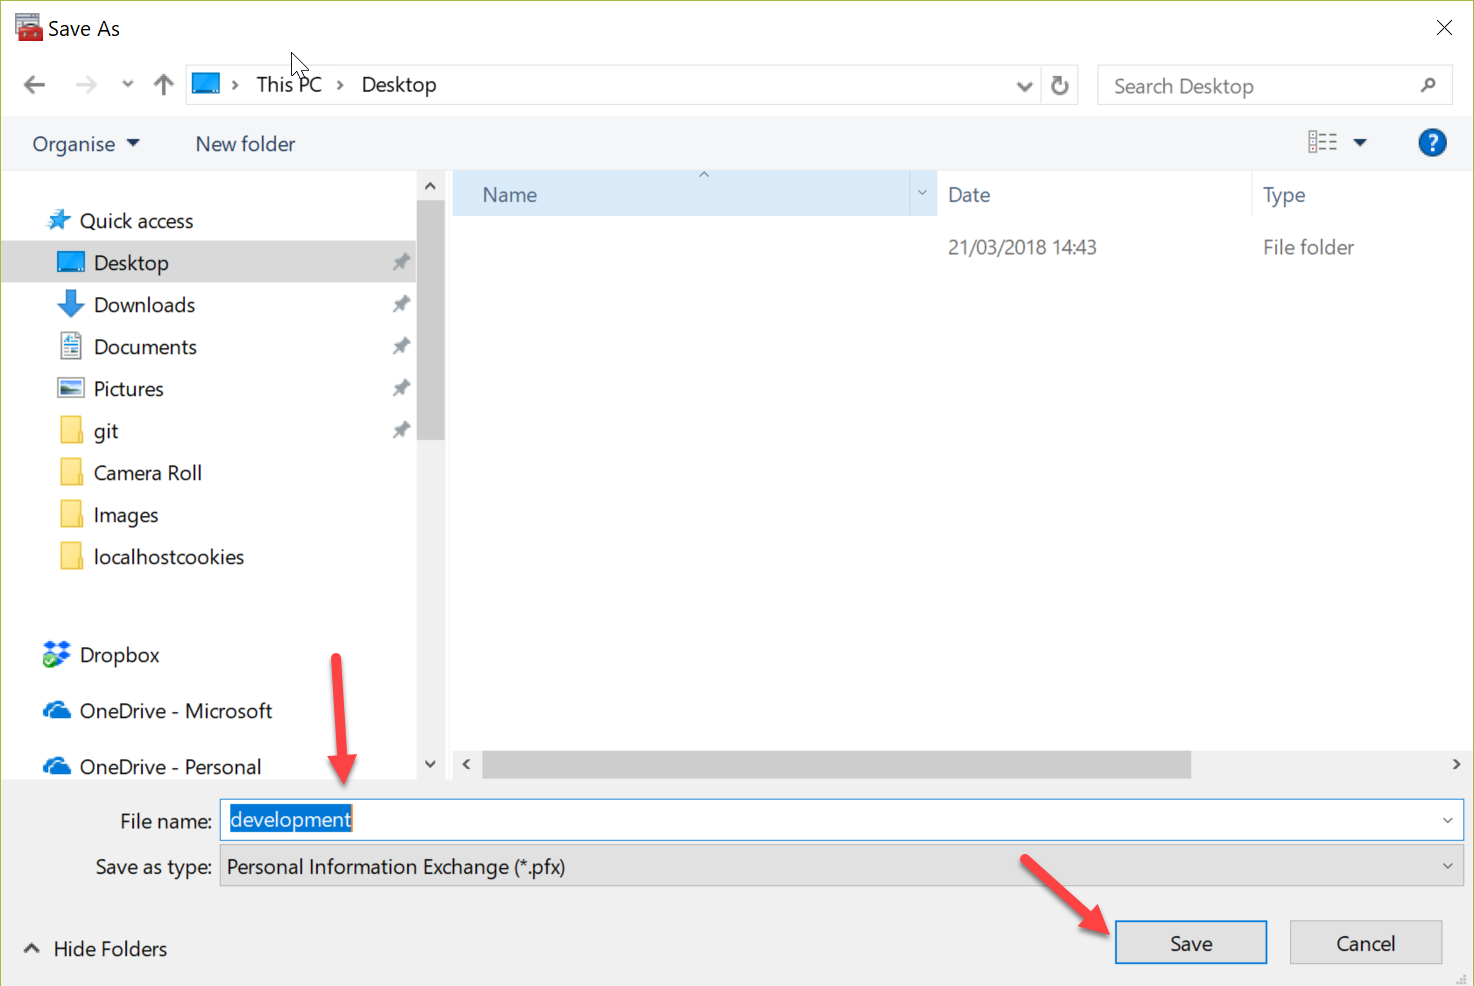
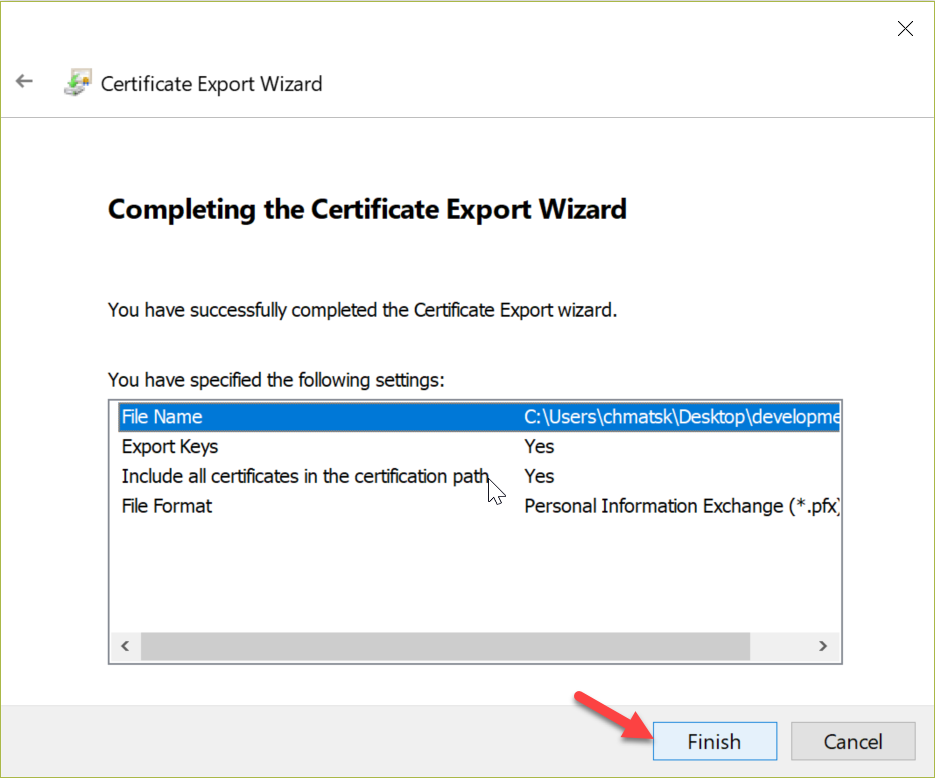
Next, we can follow the screenshots below to export the certificate into a *.pfx using the export wizard.
On Mac or Linux things are less complex and require less steps! We can use OpenSSL to create and export a *.pfx certificate with the following commands:
openssl req -config https.config -new -out csr.pem
openssl x509 -req -days 365 -extfile https.config -extensions v3_req -in csr.pem -signkey key.pem -out https.crt
openssl pkcs12 -export -out https.pfx -inkey key.pem -in https.crt -password pass:<password>
Using the certificate in ASP.NET Core
To force HTTPS for all requests on a site running under Kestrel, we need to configure Kestrel accordingly. For Kestrel to use our certificate, we have a couple of options on how to load it
- We could load it directly from the project assembly (what we will be doing in this example)
- We could load it from the certificate store.
If you want to go with option #2 you can find an example on [this GitHub gist](https://gist.github.com/danroth27/c942a885ea8f229fe2e62114b8369cde" target="_blank).
For this post we will implement option #1, so we need to copy the certificate to the root of our ASP.NET Core project. This will allow us to load it using the EmbeddedFileProvider. You can find more details on FileProviders in .NET Core [here](https://docs.microsoft.com/en-us/aspnet/core/fundamentals/file-providers#file-provider-implementations" target="_blank)
Open the *.csproj file and add the following configuration to ensure that the certificate is copied/embedded in the assembly.
<ItemGroup>
    <EmbeddedResource Include="<your-certificate-name>.pfx" />
</ItemGroup>
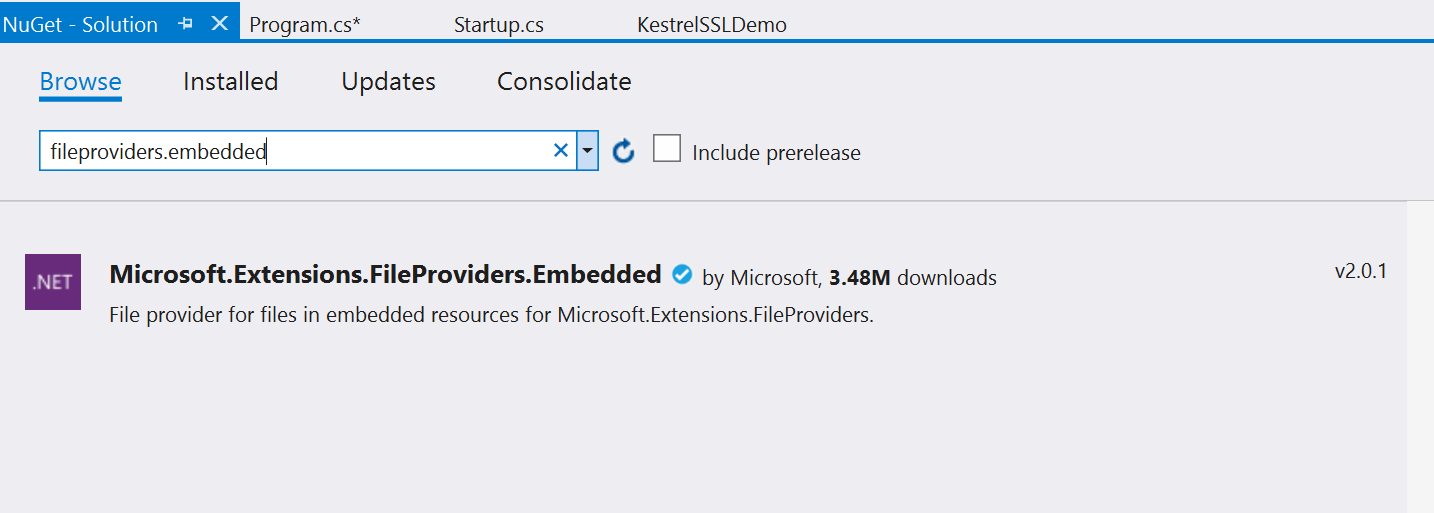
We also need to add the appropriate NuGet package to ensure so that we can access our embedded resources. Open the NuGet package manager and install the Microsoft.Extensions.FileProviders.Embedded package, currently at version 2.0.1
Now we can add the following code in Program.cs to instruct Kestrel to load and use the certificate:
The LoadCertificate() method pulls the certificate and the Main() method instructs Kestrel to use the certificate and bind it to a specific port number. The port number is totally configurable (within the accepted and valid range of course). You may have noticed that in this example we configure Kestrel to only accept HTTPS traffic.
IMPORTANT: for this example I've hardcoded the certificate's private key directly into the code, mainly for simplicity (ok, I was lazy!). You'll also notice that I used a "very strong" and hard to break password - not really. This MUST be avoided when writing production code. Instead, we need to pull the private key and other sensitive information from a secret store, like [Azure Key Vault](GHOST_URL/azure-key-vault-the-new-security-service-from-microsoft/" target="_blank), to ensure that this information is protected. Secrets should never live inside your source code, any source code!.
Redirecting and enforcing HTTPS
In the previous code example, we made sure that the only way to access the site was through HTTPS. This was achieved by configuring a single HTTPS endpoint on Kestrel.
However, there are cases were we may need to enable both HTTP and HTTPS endpoints and but only allow HTTPS requests. Non-HTTPS requests should be redirected to the HTTPS endpoint instead. How would you go about implementing this?
In the "old" world this would be a configuration change in our web.config like in this [StackOverflow example](https://stackoverflow.com/a/9823208" target="_blank). But now there's no web.config (YES!) and we don't live in a Windows-only world anymore (double YES!). Ok, there's a web.config but only applies to IIS anyway and shouldn't be used!!
In the world of ASP.NET Core, we can leverage the power of middleware to enforce HTTPS-only request and to configure HTTPS-redirects.
In our Startup.cs file, we need to add the following 2 pieces of code
public void Configure(IApplicationBuilder app, IHostingEnvironment env)
{
    ...
    var options = new RewriteOptions().AddRedirectToHttps(302, 44358);
    app.UseRewriter(options);
    ...
}

public void ConfigureServices(IServiceCollection services)
{
    services.AddMvc();
    services.Configure<MvcOptions>(options =>
    {
         options.Filters.Add(new RequireHttpsAttribute());
    });
}
The complete Startup.cs code is available below but I isolated the important bits above.
IMPORTANT: Requiring HTTPS globally using the
options.Filters.Add(new RequireHttpsAttribute());configuration is a security best practice. Applying the [RequireHttps] attribute to all controllers/Razor Pages isn't considered as secure as requiring HTTPS globally. You can't guarantee the [RequireHttps] attribute is applied when new controllers and Razor Pages are added.
Source for the above: https://docs.microsoft.com/en-us/aspnet/core/security/enforcing-ssl
Spinning up Kestrel now should yield the following logs which confirm that we're overriding the defaults and we're only listening on the HTTPS endpoint
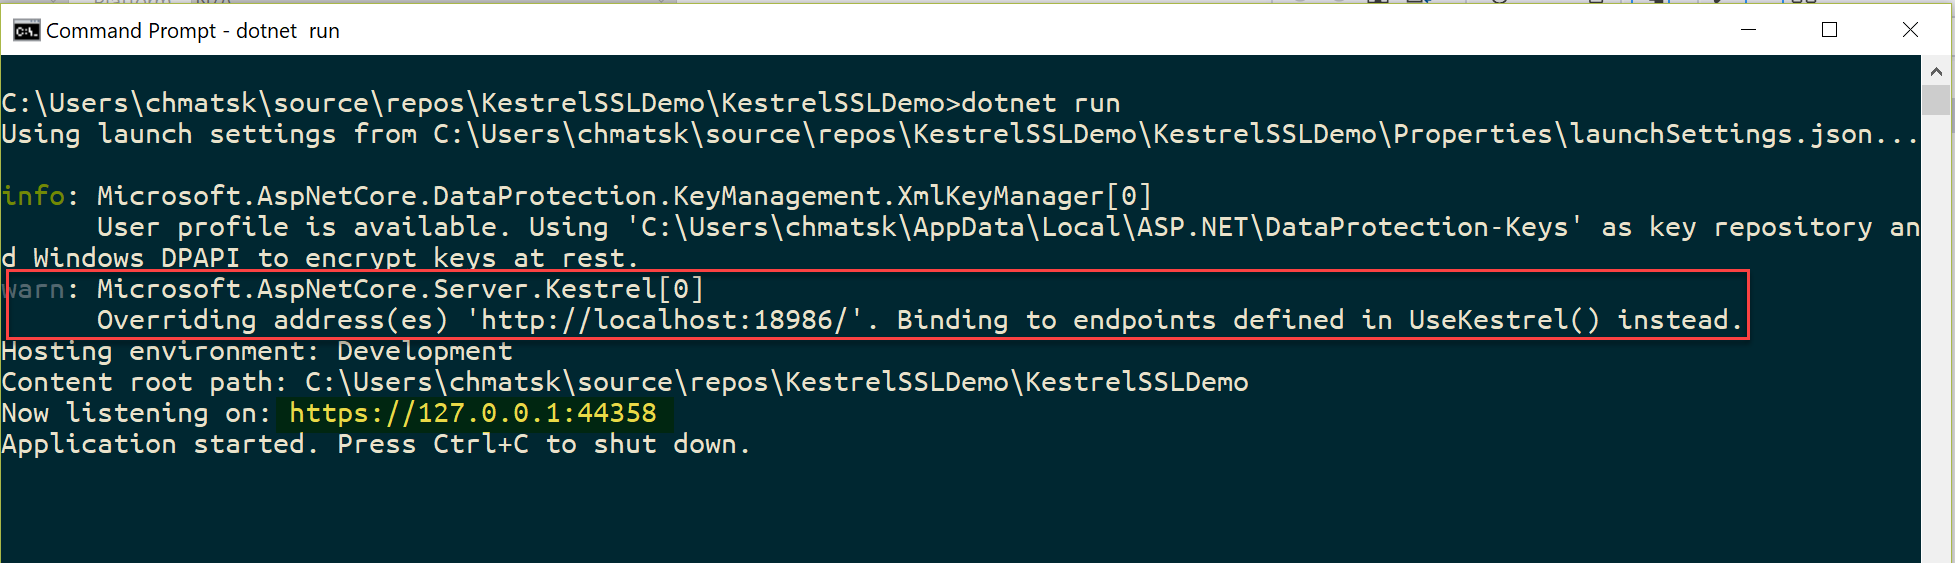
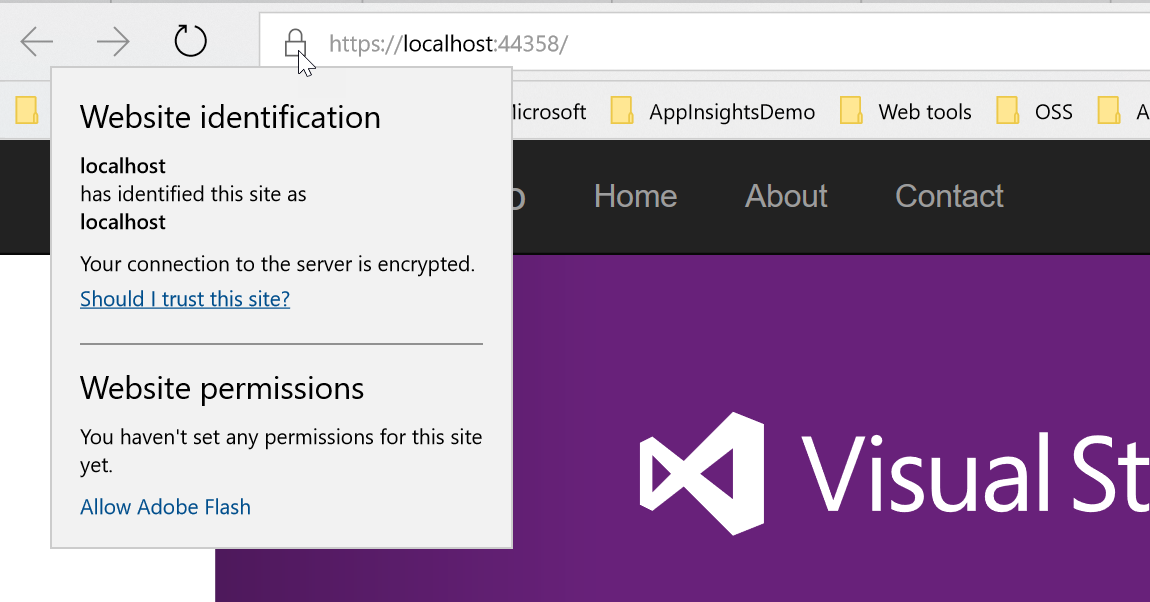
After navigating to our site using any browser we can see that the site is running under SSL using our self-signed certificate - sweet
Source code
You can find a fully working project with all the bits described here on my GitHub [repo](https://github.com/cmatskas/SSLwithKestrel" target="_blank)
Summary
Whether we like it or not, SSL/TLS is a necessity of the modern web. for example, Google will now actively warn users that your site is insecure and down-rank you until you implement SSL/TLS. Developers also need to ensure that a site runs as expected when in production so developing and testing locally with SSL/TLS is not only best practice but necessary too!
Hopefully this post provides you with an end-to-end, comprehensive guide on how to implement this for any ASP.NET Core in development, especially when not running under IIS or Apache/Nginx.