Azure Search can work really well with Azure Blob Storage. It can automatically index and analyse documents uploaded to a Storage Container to make it easy for you to expose the data in your application.
When working with Blob data, Azure Search is designed to incrementally add new documents automatically. However, where it gets really tricky is when blobs are deleted from storage. The index doesn't get updated automatically, so the data ends up in a stale state. There's a way to use a soft delete approach to indicate to an Azure Search data source that a document/blob should be excluded from the index but this requires that the indexer is run to remove the excluded Documents from the index.
We could, of course, use the Indexer scheduler to clear the index but this would still leave the soft deleted blobs in the storage account. This is where Functions come into action!
For my approach to work, we need to implement the following bits:
- An Azure Index DataSource with a soft delete option
- A function to run the Indexer
- A function to permanently delete the soft-deleted blobs
Implementing a soft delete policy in the Azure Search data source
The following code shows how to create or update the Azure Search Index data source to use a soft delete policy:
The soft delete makes use of a blob metadata property: IsDeleted. This document goes into more detail on [Blob Indexing and Soft Deletes](https://docs.microsoft.com/en-us/azure/search/search-howto-indexing-azure-blob-storage#incremental-indexing-and-deletion-detection" target="_blank). When our application or process needs to remove a blob from Azure Search, we first need to update the blob metadata property (IsDeleted) and set it's value to true. Below I have attached some sample code that does exactly this:
These 2 code snippets take care of the delete policy and the code to set the metatag property, necessary, we can now create the Function to run our Indexer and delete unwanted blobs. At this point it's important to note that there are different ways to solve the problem:
a) We could implement everything within one Function. However, this does not scale as well, especially if we have lots of blobs to remove.
B) Use a number of Functions that work together to orchestrate the solution:
- 1 Function to run the Indexer and update the Azure Search Index
- 1 Function to retrieve a list of all blobs to be deleted and put them in a queue
- 1 Function that deletes the blobs using a queue trigger. This one will fan-out depending on the queue size.
A Function to run the Azure Search Indexer
Although this operation doesn't require a Function to run, since indexers have their own schedulers, implementing it through a function means that we can orchestrate the whole process to run in unison.
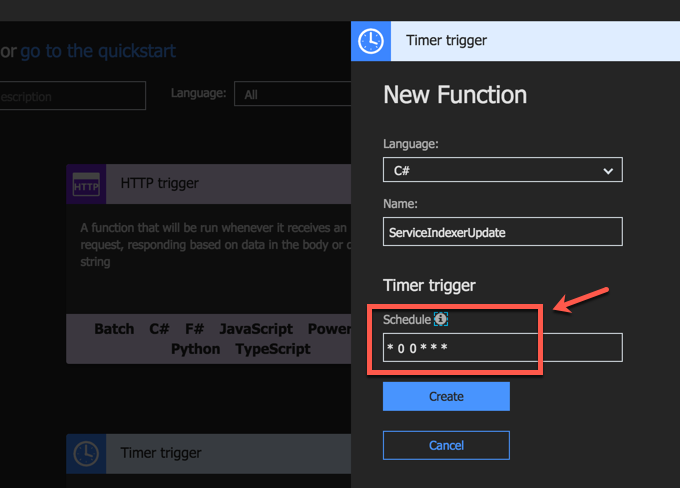
First, we need to create the Function to run on a schedule defined as a the Cron job. I've configured the schedule to run every night at midnight:
The Function code that runs the indexer is shown below:
You'll notice that this Function makes use of the Azure Search namespaces, which are not "natively" available to Azure Functions.
FYI - There's a number of .NET APIs/namespaces available by default to Azure Functions as part of the runtime. These namespaces can be found [here](https://docs.microsoft.com/en-us/azure/azure-functions/functions-reference-csharp#importing-namespaces" target="_blank).
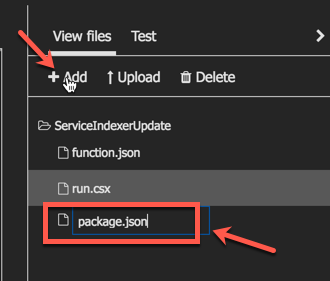
To make this namespace available to our Function, we need to add the appropriate NuGet package dependency. Add a packages.json file within your Function. In the portal, under the View Files tab, click on the +Add link and add a new file:
Open the file and add the necessary dependency to the Azure Search SDK as per the example below:
{
  "frameworks": {
    "net46":{
      "dependencies": {
        "Microsoft.Azure.Search": "3.0.4"
      }
    }
   }
}
As soon as you save and close the file, Kudu (the super AppService orchestrator) will attempt to restore the designated NuGet packages. This should generate logs similar to the ones below:
2018-01-23T06:54:17  Welcome, you are now connected to log-streaming service.
2018-01-23T06:54:32.688 Function started (Id=5c37f45e-c995-4d76-b424-3722316e6338)
2018-01-23T06:54:32.688 Package references have been updated.
2018-01-23T06:56:17  No new trace in the past 1 min(s).
2018-01-23T06:57:17  No new trace in the past 2 min(s).
2018-01-23T06:57:16.700 Starting NuGet restore
2018-01-23T06:57:19.921 Restoring packages for D:\home\site\wwwroot\eventgriddemo\project.json...
2018-01-23T06:57:20.467 Restoring packages for D:\home\site\wwwroot\eventgriddemo\project.json...
// logs omitted for clarity
2018-01-23T06:57:23.278 Installing Newtonsoft.Json 9.0.1.
2018-01-23T06:57:23.309 Installing Microsoft.Rest.ClientRuntime 2.3.7.
2018-01-23T06:57:24.801 Installing Microsoft.Rest.ClientRuntime.Azure 3.3.6.
2018-01-23T06:57:25.792 Installing Microsoft.Spatial 7.2.0.
2018-01-23T06:57:27.039 Installing Microsoft.Azure.Search 3.0.4.
The Function code that runs the Search Indexer is shown below:
A Function to retrieve all soft-deleted blobs
Once the indexer has run successfully, we can then go ahead and retrieve all the blobs that need to be deleted. The Function below makes use of Storage Queue as an output binding to populate a queue with the list of blobs that need to be deleted. This time I chose to use a NETStandard C# Function:
For this Function to work, you'll need to define the following Application Settings in your Function App:
"AzureWebJobsStorage": "<StorageConnectionString>",
"AzureWebJobsDashboard": "<StorageConnectionString>",
"StorageQueueConnectionString": "<StorageQueueConnectionString>",
"StorageBlobConnectionString": "<StorageBlobConnectionString>"
}
A Function to delete the blob data
Finally, we need a Function that gets triggered off the Azure Storage Queue and deletes the blob based on the queue message. The queue gets populated by the previous Function. By now you can see how powerful bindings are and how they make coding more trivial by removing much of the plumping. The code below shows how this Function is implemented:
Summary
I hope this post did a good job in showcasing the flexibility and power of Azure Serverless services (i.e. Functions in this instance) and how we can use multiple, small components to create a larger, more complex solution.