This is a little unknown gem that I've used a few times as I help customers secure access to their Azure Web Apps.. Traditionally, if one wants to restrict access to a website running on a VM (i.e IaaS) then they can make use of Firewalls to ensure that everything goes through a single endpoint and access is restricted. However, as we move to the cloud and further up the stack (PaaS or FaaS) we give lose some of that tight control for the benefit of using a managed service!
But what if you wanted to run your website on Azure WebApps and still restrict access to only a valid number of IP(s)? A very common scenario where this may be desirable is when a customer wishes to use a WAF (Web Application Firewall) to protect a public website. Another common scenario is configuring an Azure WebApp to be only accessible by internal Ips. Although technically an Azure WebApp is always accessible due to its public endpoint youwebsitename.azurewebsites.net there are a couple of ways to block unwanted access.
The process is not as straightforward but at least there is a way to achieve what we want.
Option 1 - Using IpSecurity in the web.config
Since we run on PaaS we don't have access to the underlying IIS. Ok, there a few ways to connect remotely and manage your IIS instance but I feel it almost defies the purpose. I prefer to use code/configuration settings to achieve the same results. IpSecurity is not new and it's been available for a while. Consequently, assuming we need to block access to a specific IP address or IP address range, we can use this setting inside the web.config to explicitly set up our exclusions. This works even for non-.NET sites since all websites running on Azure Web Apps run under the context of IIS and in extension contain a default web.config
The example below shows you how to block both an individual IP and an IP range:
There are a few ways to whitelist or blacklist Ips (always prefer whitelist as a recommended practice) so my recommendation is to read through the [official documentation](https://docs.microsoft.com/en-us/iis/configuration/system.webserver/security/ipsecurity/" target="_blank) to better understand how to setup your environment.
Option 2 - Using IpSecurityRestrictions on Azure WebApps
This option is a, somewhat, hidden feature and one that I only came across recently. Rather than using the web.config to set IP restrictions we can use ARM templates (remember Infrastructure as Code?) or PowerShell and apply the settings directly on the AppService. The ARM template extract that instruments the IP restrictions is shown below:
https://gist.github.com/cmatskas/c693424e1cb25b9798643e6ffc6a7fd4
Pay special attention to lines 28-35 where we define the rules for IPSecurity. If you prefer to use PowerShell then the code necessary to achieve the equivalent is shown below:
Finally, if you prefer to use a GUI to apply restrictions then we can use the portal to configure the allowed IPs. Open your website and head to the Networking blade.
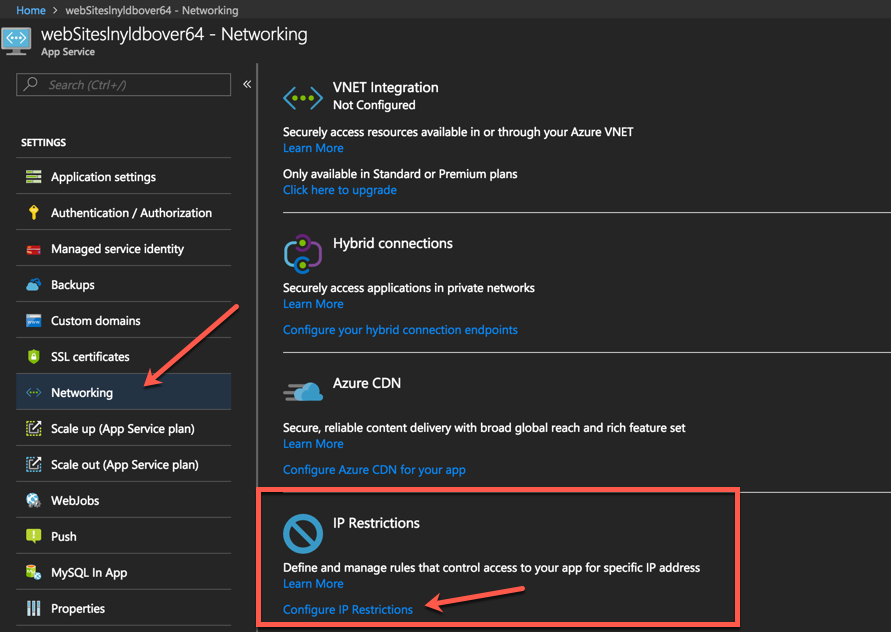
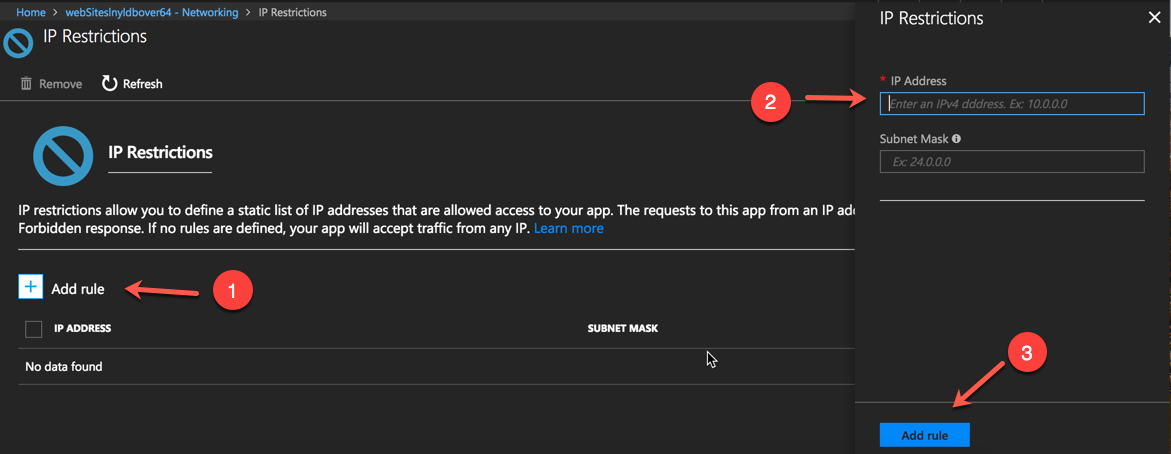
Press the Configure IP Restrictions link to open the new blade. Then follow the steps as per the picture below Add Rule -> IP address and Subnet Mask -> Add Rule Button
Many thanks to [Ben Coleman](https://twitter.com/BenCodeGeek" target="_blank) for making me aware of the GUI option! Now you know too :)
PROS
As you can see, there are 2 different ways (ok, 3 if you count the PowerShell script) to configure IP Restrictions to your website running on Azure WebApps. If it were down to me, I would go with the ARM template option as it's more transparent and can help understand how things are configured on our WebApp. ARM also promotes the Infrastructure as Code discipline which ties nicely with DevOps.
CONS
Unfortunately, these options are a stop-gap and not the perfect solution. The biggest problem is that requests need to hit the IIS worker or the instance running your site before applying the rules. This means that instead of blocking request at the network edge, we rely on the application stack to take care of security.
Managing IP restrictions the right way
Right now, if we want to properly segregate and isolate our site from external access based on an IP range, we need to use Isolated instances aka [Azure Service Environment](https://azure.microsoft.com/en-us/blog/announcing-app-service-environment-v2/" target="_blank). This is an expensive solution because, in effect, you provision a number of VMs that you use to deploy and run your applications. ASEs are also slow to deploy, even in ASEv2 which was recently released. We are talking hours over minutes.
For me, the ideal solution would be having the ability to use a [Virtual Network Service Endpoint](https://docs.microsoft.com/en-us/azure/virtual-network/virtual-network-service-endpoints-overview" target="_blank). A Service Endpoint is a vNET that we can apply on to a service (Azure Storage & SQL recently introduced support for this) and configure Network Security Groups to provide security and network isolation. This feature is on the roadmap for Azure WebApps but there are no concrete dates yet.
I hope that the solutions shown above can help you secure your site and stop undesired access while the product group is working on making Service Endpoints a reality