Automation is great. It's the bedrock of any successful IT department and the default solution for any task that has to be repeated more than once. I'm a big proponent of automation and, since I spend most of my time in Azure, I try to automate as many tasks as I can.
Today, I'll explain how to automate your Azure login in order to allow your scripts to run without any supervision.
Disclaimer: many of these tasks should be running using the [Azure Automation service](https://azure.microsoft.com/en-us/services/automation/" target="_blank) because of better integration and smoother on boarding. There's a ton of ready-made RunBooks in our [RunBook Gallery](https://azure.microsoft.com/en-us/blog/introducing-the-azure-automation-runbook-gallery/" target="_blank) to do most of the default tasks such as VM maintenance etc. This post is about scripts running outside that safe environment.
Create an Application in Azure Active Directory (AD)
To automate our tasks we need an Active Directory (AD) application and a Service Principal. The AD application contains the credentials (an application id and either a password or certificate). The service principal contains the role assignment (permissions on the subscription). You can use the same AD application to create many service principals with different permissions.
Execute the following commands one at a time to ensure you don't miss out something. I've also attached the output from these commands for clarity
Open the PowerShell ISE or any other PowerShell scripting tool (Visual Studio code, command line etc)
1 - Log in to your Azure Subscription
Login-AzureRmAccount
2 - Choose the right subscription
Select-AzureRmSubscription -SubscriptionId <Your Subscription Id>
If you don't know your subscription id or name, use the following command to list all your subscription and choose the right one
Get-AzureRmSubscription
3 - Create the Azure AD Application
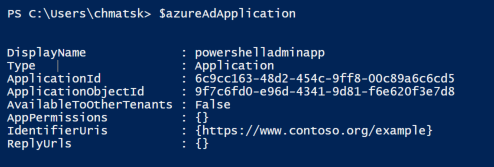
$azureAdApplication = New-AzureRmADApplication -DisplayName "powershelladminapp" -HomePage "https://www.contoso.org" -IdentifierUris "https://www.contoso.org/example" -Password "<Your very secure password>"

$azureAdApplication
This should generate the following output.

Feel free to ignore the IdentifierUris and HomePage parameters. Just stick something the resembles a URI and feel safe in the thought that they are never verified or used by your application.
4 - Create the Service Principal
New-AzureRmADServicePrincipal -ApplicationId $azureAdApplication.ApplicationId
The output of this command should look similar to this:

5 - Assign Permissions to the Service Principal
#New-AzureRmRoleAssignment -RoleDefinitionName Contributor -ServicePrincipalName $azureAdApplication.ApplicationId.Guid

The current principal is configured as a Contributor. If you want to know more about RBAC Built in roles, have a look here:
https://azure.microsoft.com/en-us/documentation/articles/role-based-access-built-in-roles/
This was the last step. Make a note of ApplicationID and the password you used earlier as we'll need them to automate our script execution next
Automate the script execution login to Azure
To run any script against Azure, you need to first authenticate. If we are to automate things, we don't want any part of the script to require manual intervention. And this is where our ApplicationID and ServicePrincipal come handy.
The following script is an example of how you would use these to login and run an arbitrary command. This is a very basic example that can become the basis for what you create next.
NOTE: at the time of writing this post, there's a bug where the Service Principal is missing permissions to the latest Graph API causing an error to appear when you authenticate and run scripts using this approach. The error, attached below, can be safely ignored.

This is due to be fixed soon and you can follow its progress on GitHub [here.](https://github.com/Azure/azure-powershell/issues/1896 " target="_blank)
Conclusion
It only takes 4 extra steps to create and use a Service Principal. The benefit of this approach is that you can easily manage and audit access to your Azure resources while you automate things.