It's been a long time since I got the chance to play with Azure Functions, one of my all time favorite Azure services. I mean, if you are going to create an API today then why not just use Functions? And if you're going to create an API, why not secure it with Azure AD? In this blog post, I'll show you how to add the necessary components to your Azure Function to validate access tokens from incoming requests against Azure AD.
Prerequisites
You will need to following to be able to develop and run functions locally
- Azure Function Core Tools v3
- Azure Storage Emulator
- Visual Studio Code
- Azure Functions VS Code Extension (optional)
- .NET Core 3.1
Create your Azure Function
We are going to use Visual Studio Code with the Function Core Tools (CLI) to initialize and build the code for our C# Azure Function. Open up your favorite shell and type the following commands to create the Function:
func init <Function Name>You then need to select the language, which, in our case, will be dotnet
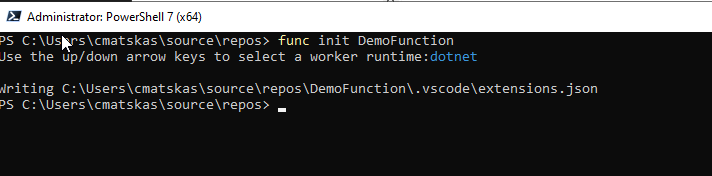
If you open the newly created folder you should see the following file structure:
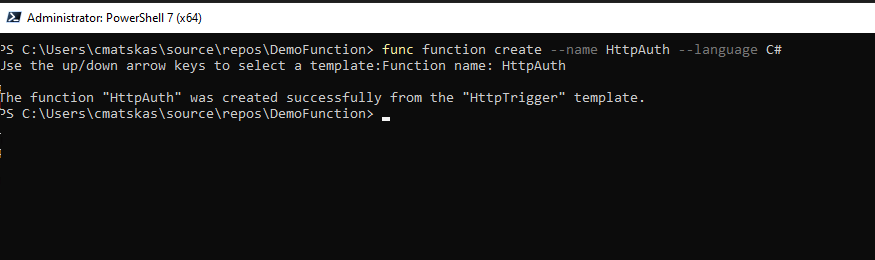
At this point we have our Function App, i.e. the Function App definiation, but no Functions or code yet :). To add a function we need to run the following command:
func function create --name <yourFunctionName> --language C#You will be prompted to choose a Trigger (what makes the Function run) -> Choose Http Trigger
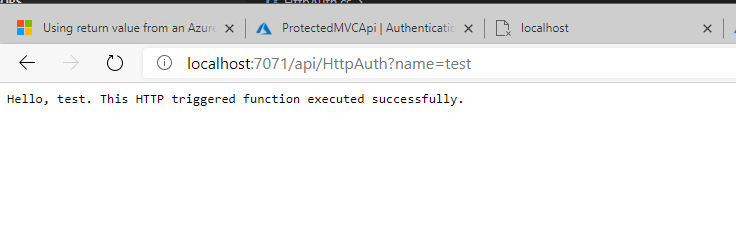
We now have the boilerplate code to run an HTTP-trigger Function locally. You can easily test this by issusing the following command func start and navigating your browser to the URL designated by the Function Core tools:
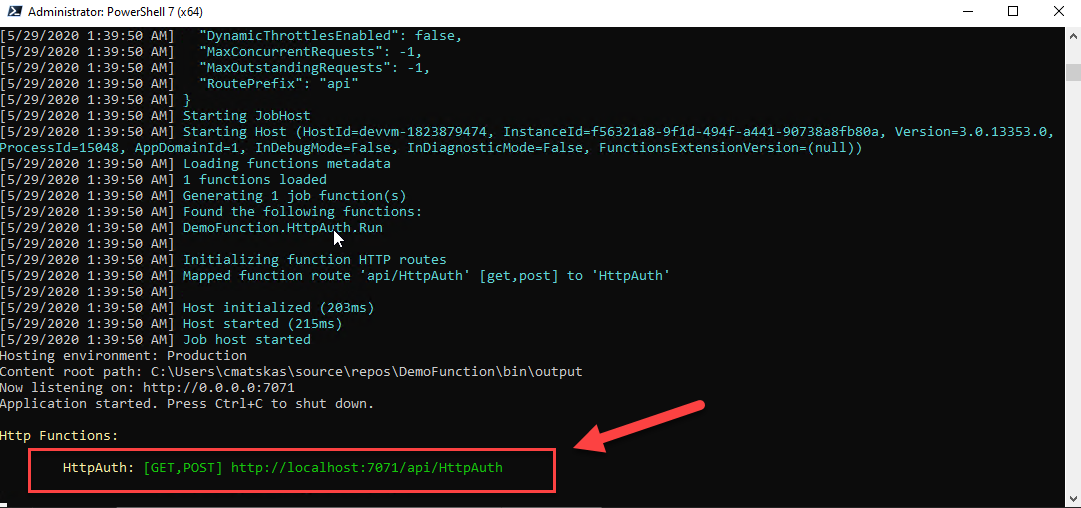
So far so good! We have a functional Function! (see what I did there)?
Create your Azure AD App Registrations
For any app to be able to allow users to authenticate against Azure AD or validate access tokens, we need an App Registration. This will tell Azure AD what our app is supposed to do, what permissions it needs, where it will be running etc. Navigate to your Azure AD tenant and go to the App Registrations tab.
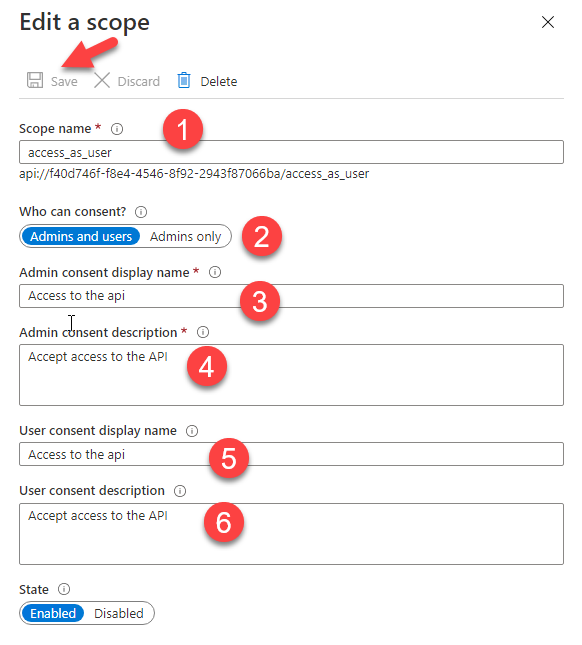
Create a new app, give it a meaningful name, select the Accounts in this organizational directory only option and press Register! Next, navigate to the Expose an API tab and Add a new Scope. The most important bit is the Scope name which in our case should be access_as_user. Make sure to press save when you're done.
This is all we need for our Function-based API. We also need to create a second App Registration that will be used to authenticate users and acquire the appropriate access tokens to call the API. Create a new App Registration, give it a decent name, select Single Tenant apps and make sure to give it the right Redirect URI, if you're planning on using a web app or a client like PostMan to make the calls. Press Register when you are ready.
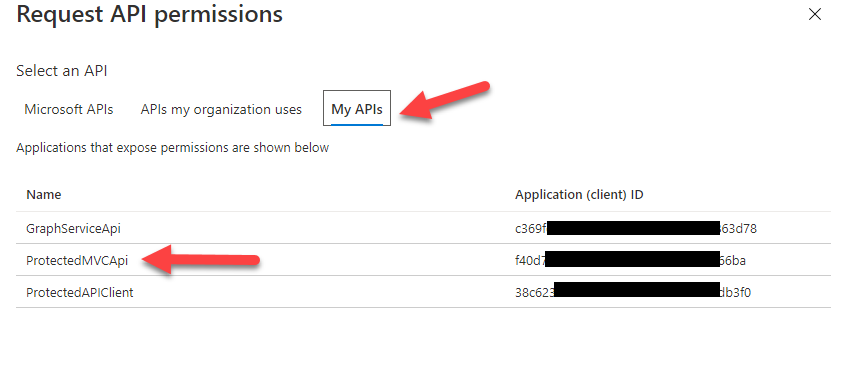
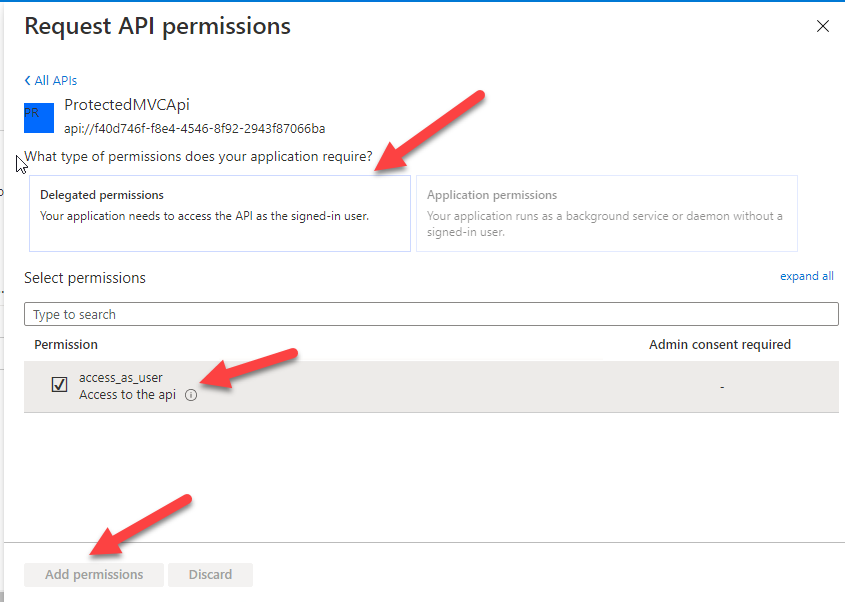
Next we need to navigate to the Authentication tab to ensure that everything is right. Check the Redirect URI and that both the Access and ID tokens are checked. If you are using Postman, you'll need to configure a Client Secret in the Certificates & secrets tab. Make sure to store it somewhere safe as you won't be able to access it again after you leave this page - you could, however, create a new one, they are cheap :) Finally, we need to configure the API Permissions tab. Select Add Permission and in the new tab, you need to select My APIs where you should be able to find the App Registration we created in the previous step:
That's all we need for the API and Client apps :) Let's write some code!!!!
Configure token validation in the Azure Function
First we need to start by adding the appropriate NuGet packages and references to our Function app. Open your *.csproj file and add the following references:
<PackageReference Include="System.IdentityModel.Tokens.Jwt" Version="6.6.0" />
<PackageReference Include="Microsoft.IdentityModel.Protocols.OpenIdConnect" Version="6.6.0" />
<PackageReference Include="Microsoft.Azure.Functions.Extensions" Version="1.0.0" />
The first two packages are required for us to work with the JWT tokens while the last one allows us to load the necessary Azure AD settings from the local.settings.json file.
Next, we need to add the necesary config settings for the Function to be able to find the appropriate Azure AD and validate the tokens. While developing locally, we will be using the settings in the local.settings.json file but in Production we will be using the Function App Settings since the json file is only used for local development and is not copied in the artifacts that get deployed to Azure. Open the file and add the following json, making sure to use the Tenant ID and Client ID of your API App Registration:
"AzureAd": {
	"Instance": "<YourAADInstanceName>.onmicrosoft.com",
	"TenantId": "b55f0c51-61a7-aaaa-1111-33569b247796",
	"ClientId": "f40d746f-f8e4-1111-aaaa-2943f87066ba"
}
Next we need to wire up the JWT token validation. Open your <YourFunctionName.cs file and add the following code:
Let's break it down a bit as there are a few components here. We have one main methodasync Run() that is the entry point for our Function. it also calls all the helper methods to retrieve and validate the token. The first helper method GetAzureADConfiguration() loads the config settings for Azure AD. The second helper method grabs the access token from the HTTP header. The bulk of the work is then done in the ValidateToken() method that leverages the JwtSecurityTokenHandler class and Open ID Connect (OIDC) to validate the token against AAD and return a ClaimsPrincipal. In the Run() method, we check that the token is passed in the HTTP Request, we then validate it and, for the sake of simplicity, we return either the name of the user that acquired the token, or an error message if the token expired or failed to validate.
We are now ready to put our code to the test! From your favorite shell, run
func startThis will run the Function locally and provide us with the test URL.
Optional step: I use ngrok to configure a public endpoint for anything that needs to be accessible on port 80 or 443 as I like to test from remote machines.
Use your tool of choice to authenticate and call your Azure Function. I like to work with Postman these days, so here's an example that shows Postman hitting my Function app using the ngrok public URL
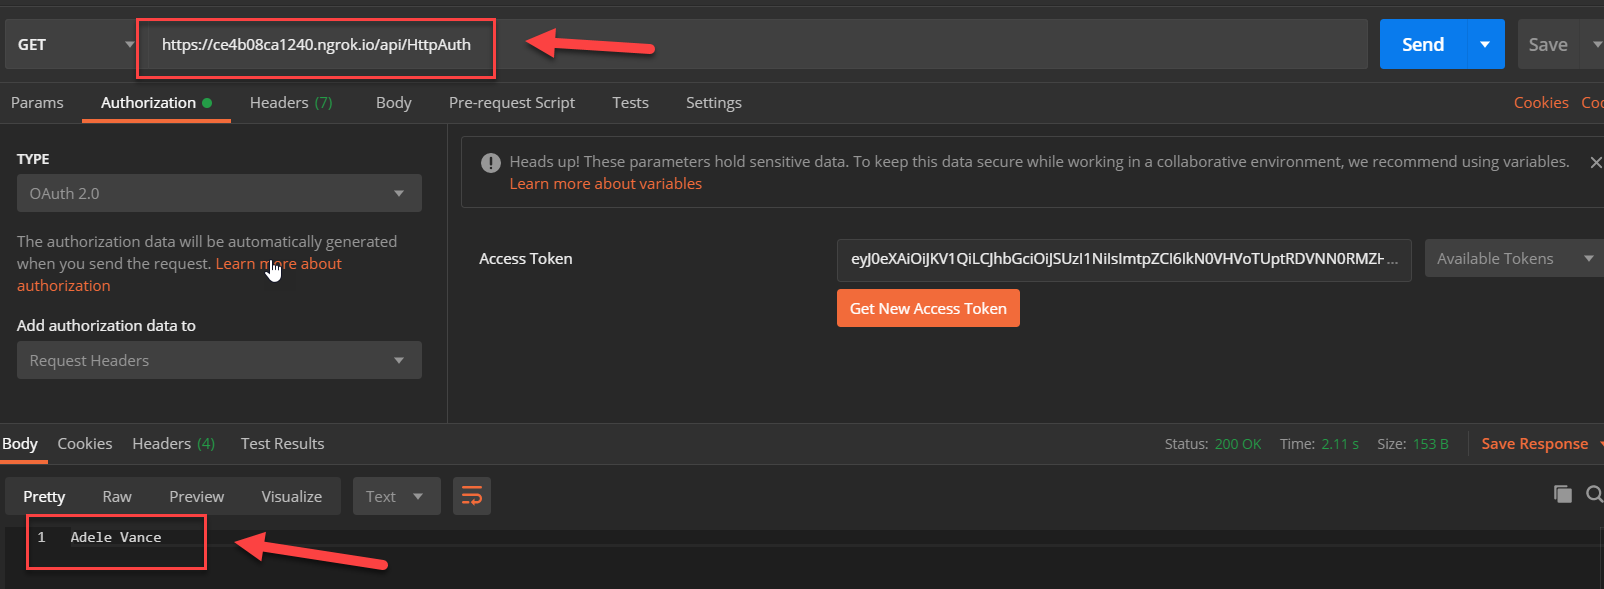
This is it. If for whatever reason your Function doesn't work, doublecheck your settings in the local.settings.json to ensure that you have the right Instance, TenantID and ClientID values.
Publishing to Azure - going live
As a next step, we want to ensure that our Function works as expected once deployed in Azure.
At this point, it's important to take a small detour to discuss about EazyAuth and the fact that both Azure Web Apps and Azure Functions provide a turn-key configuration option to add authentication to your apps or Functions without the need to write any code. So, although I could have spared myself the ~15 lines of code that does the token validation, I wanted to make sure that
- I can develop and test the code locally
- I may want to add extra authorization checks (next blog???) to ensure that the incoming access token has the appopriate scopes and maybe user roles/claims attached to it.
So there are some pros and cons with each approach. All I have to say is that there are some amazing features that you can leverage if they meet your needs and EazyAuth is one of them:)
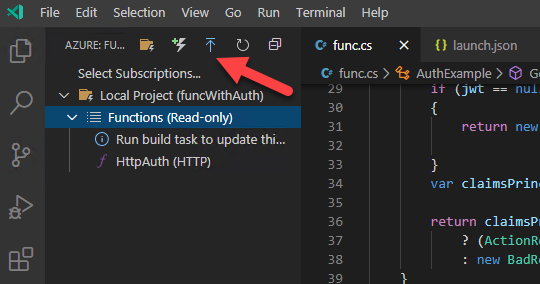
Ok! We are now ready to deploy/publish our Function to Azure and I'm going to take the lazy efficient choice and let the Azure Functions Extension in VS Code do all the work. Open the extension and find the Publish button as per the image below:
The wizard will guide you through the process and you get the choice to either create a new Function App or use an existing one. If you select an existing one, note that any previous code in that Function app will be overwritten so this is not an iterative action - it's full on deployment!
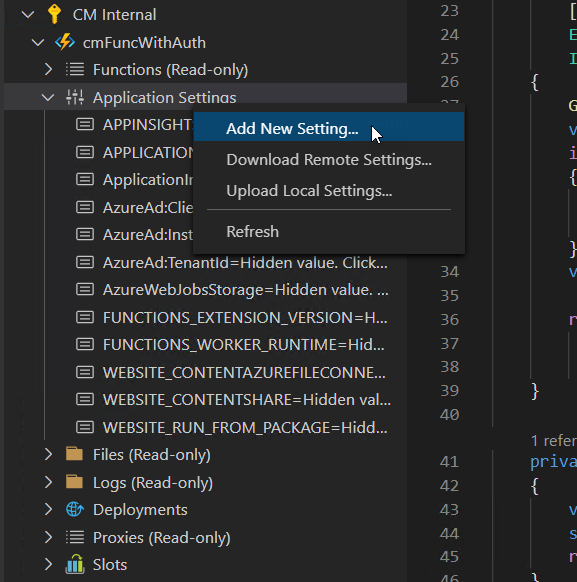
Once the publish process is completed, we have one last step and that's to configure the Function App settings (remember that the local.settings.json file is not copied to prod). We can also do this from the comfort of VS Code using the extension (this functionality is available in the Core tools as well). Select the Function App you just created or deployed, expand the treeview and find the Application Settings section. Right click and select Add New Setting:
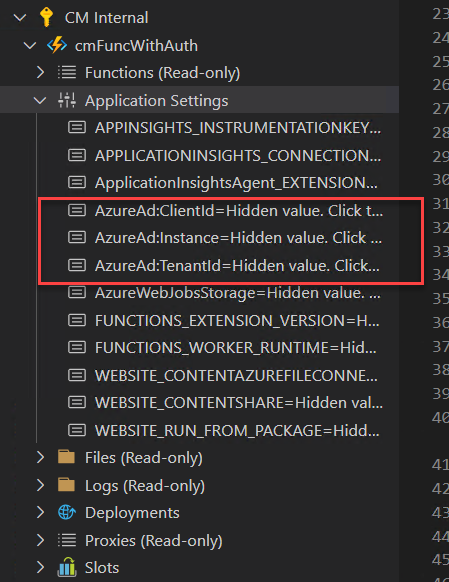
We need to add 3 settings:
Name: AzureAd:Instance, Value: <YourADTenantName>.onmicrosoft.com
Name: AzureAd:TenantId, Value <yourTenantId>
Name: AzureAd:CientId, Value <yourClientId>
We need to add the AzureAd: in the name as the code expects a top level section, i.e. AzureAd with the 3 other properties under it in the hierarchy, as per the local.settings.json configuration. In the end, the Function App settings should look like this:
If everything went according to plan and we followed all the steps above, we should be able to use Postman or any other tool/code to call the Function. The live Function URL should look something like this: https://<yourFunctionAppName>.azurewebsites.net/api/<yourFunctionName>
Summary
In this blog post, we saw what it takes to create a protected API using .NET Core 3.1 with Azure Functions and Azure AD. We were able to develop and test everything locally using my favorite tools and then we pushed the Function to a production environment. Using this approach, we know that the code works seamlessly between the different environments and we have full control on how Authorization is taking place
Upcoming blogs
- Add scope and claims validation to our Function
- Call Graph and return the data to the user, in effect implementing an On Behalf Of (user) flow
Let me know on Twitter if you want me to cover any other scenarios using Serverless and Azure AD