Or - How to eliminate your application secrets once and for all.
Developing applications using security best practices doesn't have to be hard. And yet, many organizations and developers struggle with this since the space is so vast and it's hard to know where to start. However, if you are developing for Azure, then there are some powerful features in place to ensure that you and your team can develop securely end-to-end. The main component is: Azure Managed Identities, which rely on Azure Active Directory.
Prerequisites
- An Azure Subscription
- Azure Active Directory
If you don't have an Azure subscription, you can get one totally free here. Every Azure subscription comes with a default Azure Active Directory. For this blog we will also be using Key Vault which in turn are leveraged by Managed Identities.
In this blog post we will examine how to create a secure ASP.NET Core app by eliminating all secrets and sensitive information from the configuration files or in the code. To do this, we will use Azure Key Vault and Managed Identities via th e Azure SDK. If this is the first time you hear about Key Vault, then you can refer to my previous blog posts for a quick refresher:
- Azure Key Vault - the new security service from Microsoft
- Securing ASP.NET Core application settings using Azure Key Vault
Wait a minute! The second blog post ^^^ seems suspiciously a duplicate...Well, sort of. You see, when I wrote the original blog post in 2017 there was a big component missing - Managed Identities. This blog post will highlight the unique value proposition that the Microsoft toolchain brings to your development cycle.
So, let's get to it!
Source code
You can find a fully working sample on [GitHub](https://github.com/cmatskas/ASP.NETCorewithKeyVaultAndMSI)
The ASP.NET Core Web App
Section prerequisites
If you have an existing ASP.NET Core web app you can then just add the relevant bits to your application instead of starting from scratch. For the purpose of this example, I am creating a standard .NET Core Web App using Razor Pages targeting .NET Core 5. This code also works on .NET Core 2.1 or later.
Make sure you have .NET Core installed as per the prereqs above. You can check by opening up your favorite command prompt and running dotnet --version
If you already have an app, you can skip to the section where I explain the config settings for Azure AD.
In your favorite command line, create a new project:
dotnet new webapp
This will create a vanilla ASP.NET Core Razor pages project.
Create your Azure Key Vault
Azure Key Vault, like Storage, is an integral service for apps and infrastructure and can transform the way we develop apps today. If you're worried about cost, I've added some relevant information below (this is dependent on region)
You can use whichever option you feel comfortable with (Azure CLI, PowerShell, ARM templates or the portal) to create your Azure Key Vault. In this instance, we're using the Azure CLI via the Azure Cloud Shell. In case you haven't used it before, Azure Cloud Shell is a browser-based shell experience to manage and develop Azure resources and it's available right there in the Azure Portal!
Before you run any commands, you also need to make sure that your Azure CLI context is using the right subscription.
az login az group create --name "<YourResourceGroupName>" --location "West US" az keyvault create --name "<YourKeyVaultName>" --resource-group "<YourResourceGroupName>" --location "West US"
Next, we will using the Azure CLI to add a secret that our application can use later. az keyvault secret set --vault-name "<YourKeyVaultName>" --name "AppSecret" --value "MySecret"
PSA: I love how the Azure CLI allows us to check the value for each secret az keyvault secret show --name "AppSecret" --vault-name "<YourKeyVaultName>" The Azure Key Vault set up is complete.
Securely retrieve secrets from Azure Key Vault
The new Azure SDKs make the Key Vault integration into ASP.NET Core apps pretty straightforward. There is not much code needed to pull secrets from Key Vault. The Azure.Identity library is responsible for authenticating against Key Vault in order to get the access token which we then need to pass to the Key Vault client.
However, since Managed Identities are only available when running in Azure, the Azure SDKs provides a way to use a locally authenticated account (VS Code, VS or Azure CLI authenticated user) instead. This means that we don't need to modify our code to behave differently when moving from local dev to test to QA to production environments. The code is intelligent enough to choose the right identity provider for our Key Vault client. This is the biggest benefit to developers and organizations: a secure development lifcycle backed by Azure AD that eliminates the need for developers to have access to production secrets and API keys. Azure AD and Key Vault govern the end-to-end experience.
You can read more on Managed Identities as well as the supported Azure services in the official docs
To start working with Key Vault and Managed Identities, we need to add the appropriate NuGet packages to our project. Open the NuGet Manager Console and type the following:
dotnet add package Azure.Extensions.AspNetCore.Configuration.Secrets
dotnet add package Azure.Identity
dotnet add package Azure.Security.KeyVault.Secrets
The first package adds the ASP.NET Core extension that allows us to pull configuration settings from Key Vault at start up. The second package provides the authentication mechanism so that we can securely access Key Vault (or other services). It's a core component of the Azure SDKs ecosystem. Finally, the last package brings the library necessary to interact with the Azure Key Vault service.
We now need to configure our code to use Key Vault to populate configuration settings and also pull secrets on demand. To set up ASP.NET Core to pull the secrets during startup and populate our config, we have to update the CreateHostBuilder method in Program.cs as per the code below:
using System;
using Azure.Identity;
using Microsoft.AspNetCore.Hosting;
using Microsoft.Extensions.Configuration;
using Microsoft.Extensions.Hosting;

namespace ASPCoreWithKV
{
    public class Program
    {
        public static void Main(string[] args)
        {
            CreateHostBuilder(args).Build().Run();
        }

        public static IHostBuilder CreateHostBuilder(string[] args) =>
            Host.CreateDefaultBuilder(args)
                .ConfigureAppConfiguration((context, config) =>
                {
                        var builtConfig = config.Build();
                        config.AddAzureKeyVault( new Uri("https://cm-identity-kv.vault.azure.net"),
                            new DefaultAzureCredential());
                })
                .ConfigureWebHostDefaults(webBuilder =>
                {
                    webBuilder.UseStartup<Startup>();
                });
    }
}
This code, will populate any setting parameter defined in the config file that is also found in Key Vault. For example, if I have a setting called SqlConnectionString in my appsettings.json and a secret in Key Vault with the same name, then the setting will be updated with the secret value from Key Vault at startup!
Next we will add a new Razor page so that we can pull and display the Key Vault values. That way we'll be able to see the integration in action. The code-behind will pull the Azure Key Vault secrets on demand using a KeyVault Client. The Client will authenticate to Azure AD using the DefaultAzureCredential which is provided by the Azure.Identity library. By using the DefaultAzureCredential, we eliminate the need to configure a connection string for the Key Vault. There are other credential providers if you need to be more specific: Azure.Identity docs
To create a new Razor page, we can use the dotnet cli by typing the following
cd Pages
dotnet new page -n KeyVaultSecrets
cd ..
Open the KeyVaultSecrets.cshtml.cs class and add the following code :
using System;
using System.Threading.Tasks;
using Azure.Identity;
using Azure.Security.KeyVault.Secrets;
using Microsoft.AspNetCore.Mvc.RazorPages;
using Microsoft.Extensions.Configuration;
namespace ASPCoreWithKV.Pages
{
public class KeyVaultSecretsModel : PageModel
{
public KeyVaultSecretsModel(IConfiguration config)
{
configuration = config;
}
private readonly IConfiguration configuration;
public string SecretValue { get; set; }
public string ConfigSetting { get; set; }
public async Task OnGetAsync()
{
SecretValue = "Secret value is currently empty";
// Get the secret from the preloaded config settings
ConfigSetting = configuration["SomeConfigValueFromKV"];
try
{
// grab the KeyVault Secret value on demand
var keyVaultClient = new SecretClient(vaultUri: new Uri("https://cm-identity-kv.vault.azure.net"),
credential: new DefaultAzureCredential());
var secretOperation = await keyVaultClient.GetSecretAsync("KVSercret");
var secret = secretOperation.Value;
SecretValue = secret.Value;
}
catch (Exception keyVaultException)
{
SecretValue = keyVaultException.Message;
}
}
}
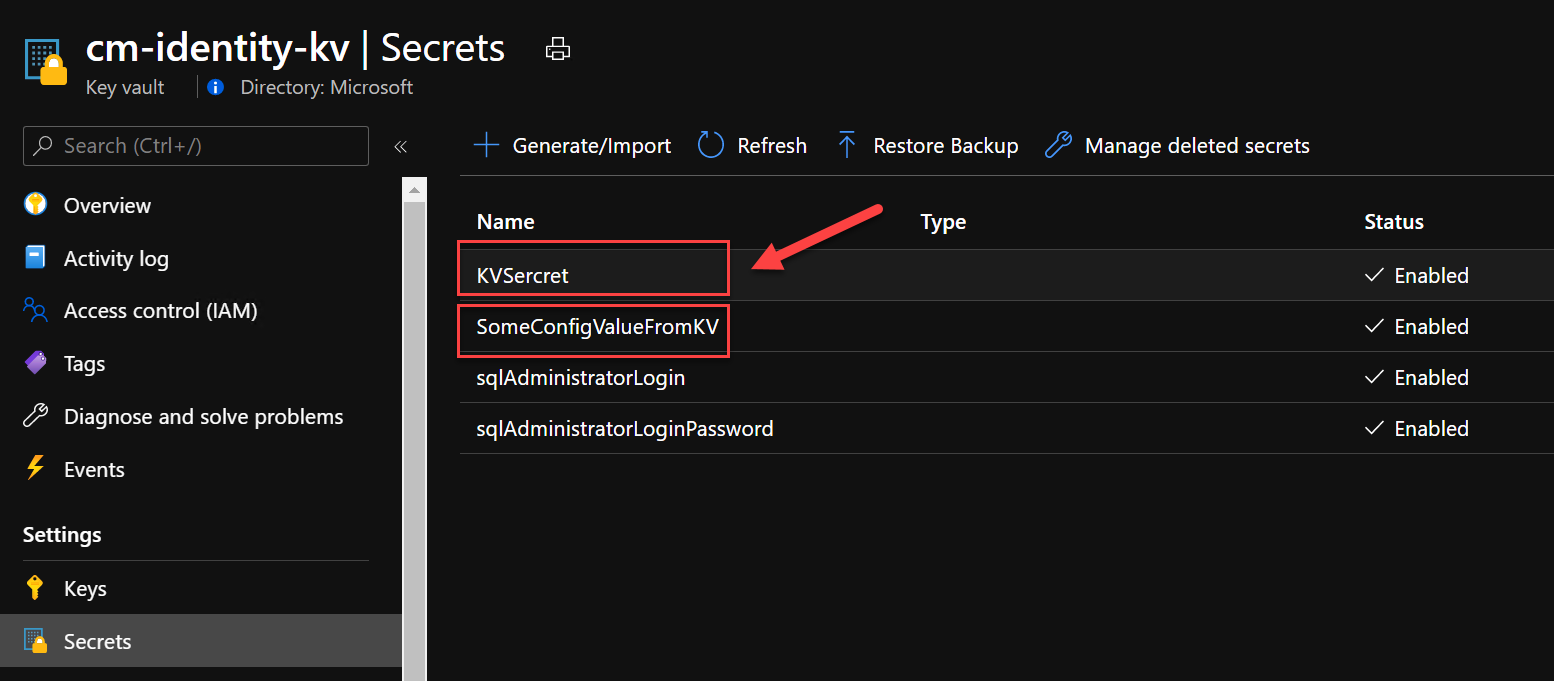
}Notice how nowhere in the code do I need to instantiate the SecretClient using a connection string or key! Below, I have attached a screenshot from Azure Key Vault that shows the two secrets we're currently pulling in our ASP.NET Core solution.
The .cshtml razor code is provided below:
@page
@model ASPCoreWithKV.Pages.KeyVaultSecretsModel
@{
ViewData["Title"] = "KeyVaultSecrets";
}
<h2>KeyVault Secrets</h2>
<p>
The KeyVault secret is: <strong> @Model.SecretValue</strong>
<br />
The Config setting from Key Vault is: <strong>@Model.ConfigSetting</strong>
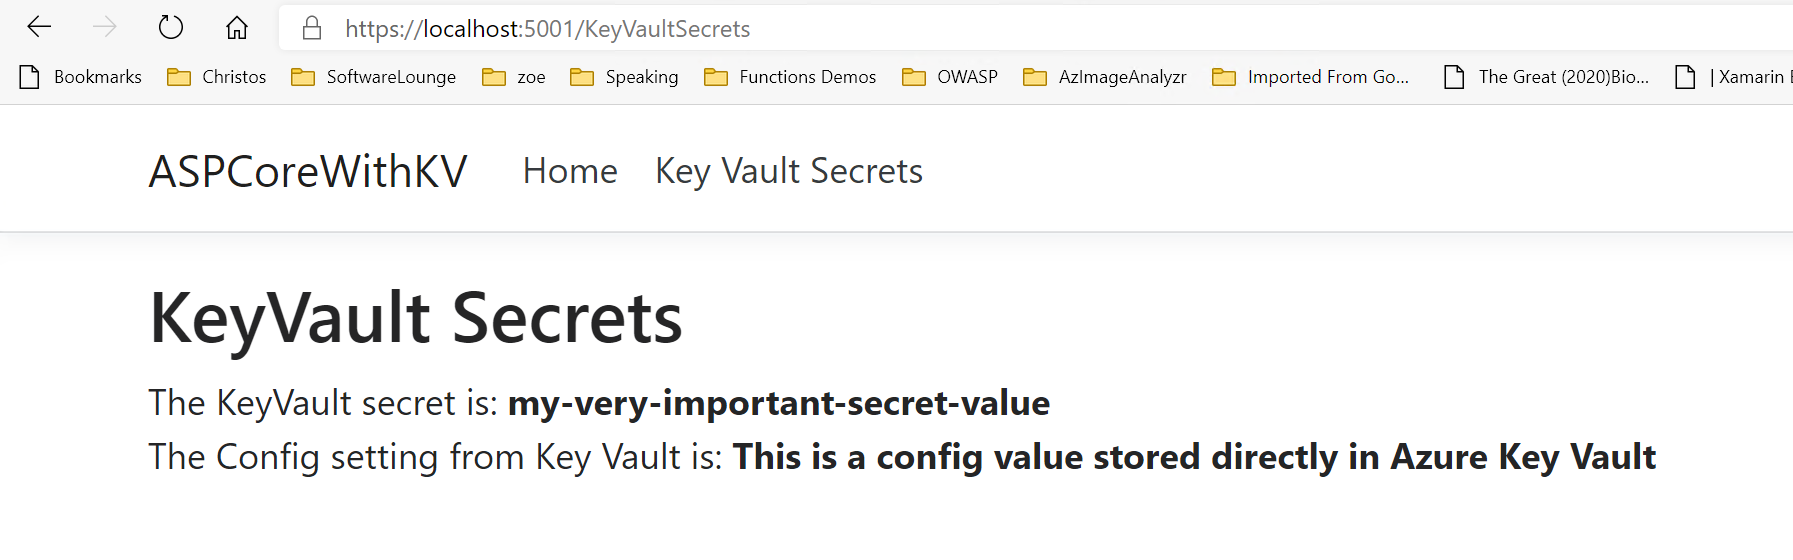
</p>Press F5 and see the magic happen!
Summary
If there is one thing you should take from this blog post is that you can build highly secure and robust apps with little effort, thanks to the the tight integration Azure AD with developer tools and Azure resources provided to you via the Azure SDKs. These have been designed ad optimized to work together and to help you be more secure and productive end-to-end. In the next blog post I will show you how to set up your production environment to use Managed Identities and then we will deploy our application so that we can test it.