A few weeks ago I wrote about Secure application development with Key Vault and Azure Managed Identities which are managed, behind the scenes, by Azure Active Directory.
At the end of that blog post, I promised to show you how to take your app from local development to production seamlessly, leveraging Managed Identities on the Azure App Service.
What does the app currently do
Before setting things up on Azure, let's remind ourselves quickly what the application does and where Azure Managed Identities and Key Vault fit. The Razor Web App retrieves two secrets from Key Vault without having to configure any connection strings for accessing Key Vault. Visual Studio uses the currently logged in account to retrieve the secrets by leveraging a couple of libraries - as explained on the original post. Now I want to publish and run this .NET Core 3.1 app in Azure without changing any code. Let's do this
Deploying to Azure
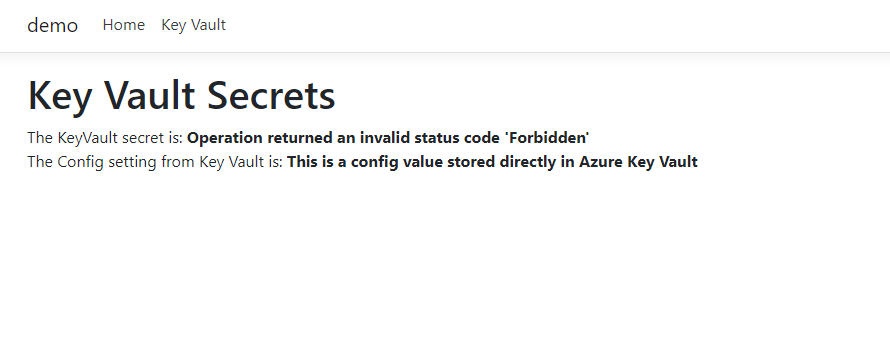
There are many different ways to deploy your apps to Azure, Azure DevOps and GitHub actions highly recommended, but I will be lazy efficient and use the Right-Click Publish feature in Visual Studio. Once the publication is successful, I navigate to the Azure Portal to check my app. Since the code is configured to pull information from Key Vault at startup, my app is going to fail miserably the first time I try to run it since I haven't configured the Managed Identity yet. If you are presented with the following error message, it's perfectly normal and expected:
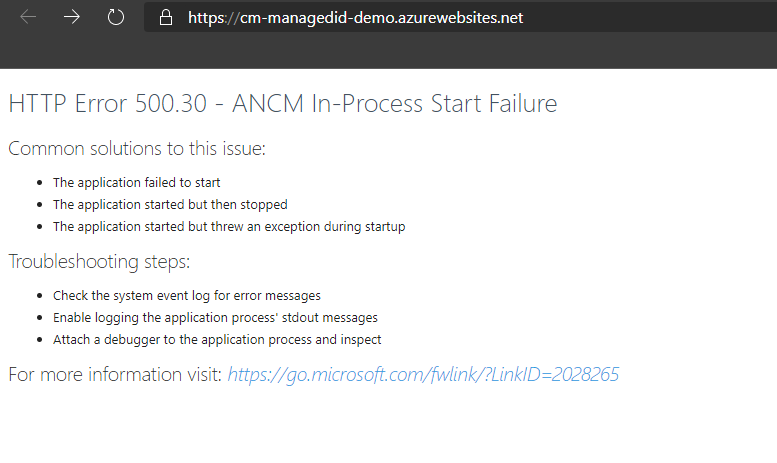
Ouch... let's fix this :)
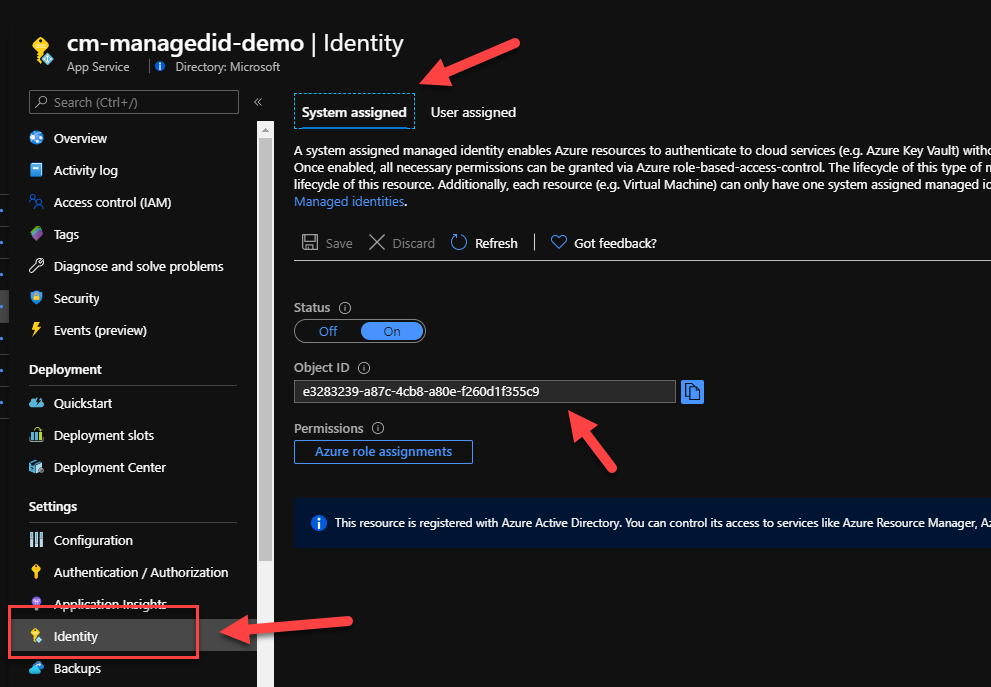
Using System Assigned Managed Identities
As soon as we deploy our web app to Azure, a system assigned Managed Identity is provisioned to our app. You can check this by navigating to the Identity tab in our App Service. This is great as it saves me a few steps. However, this account doesn't have any permissions to any of my Azure Resources.
If you want to find more details about this identity, head over to your Azure Active Directory -> Enterprise Application where you can search by application name. The name of the Manage Identity matches the name of the App Service we deployed our app to:

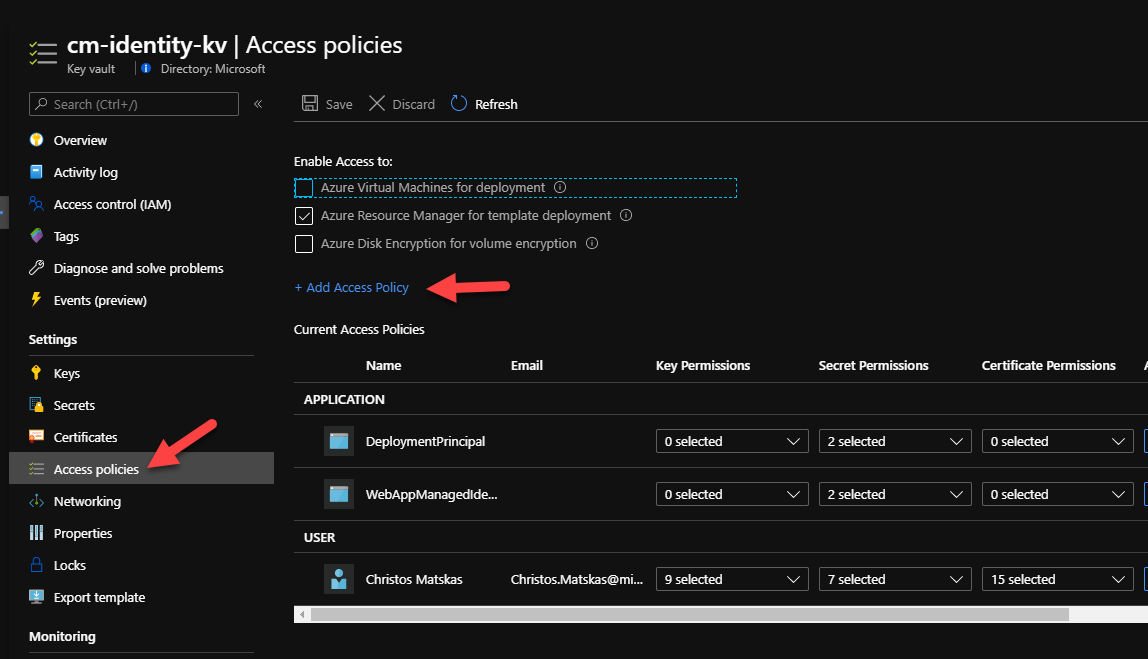
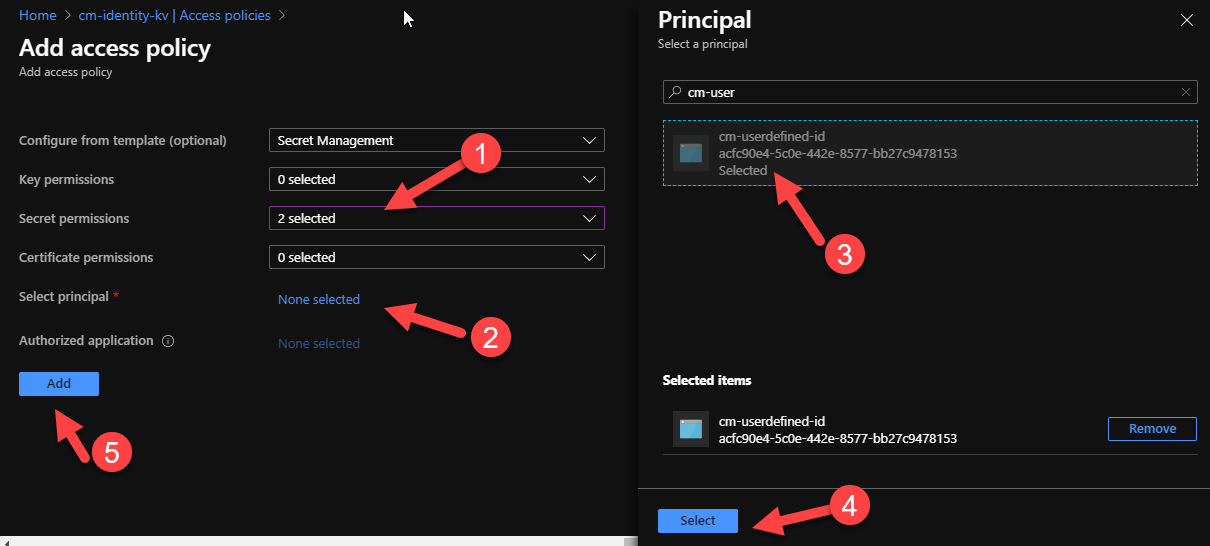
I can now go to my Key Vault and assigned the necessary permissions so that my application can retrieve the secrets using the system assigned Managed Identity. In the Azure Portal, navigate to your designated Key Vault and open the Access Policies tab. Next, press on the Add Access Policy link
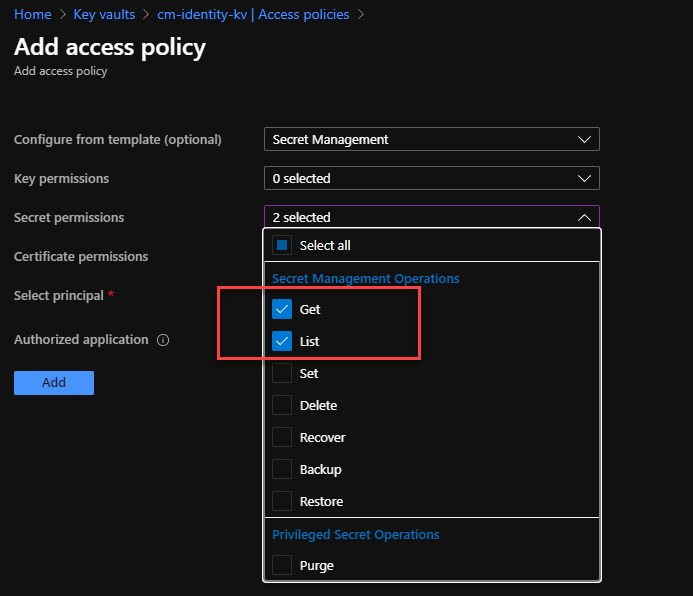
Since our web app only needs to retrieve secrets from Key Vault, we want to allocate the bare minimum permissions to the Managed Identity to reduce the risk that could come from a compromise. So, in this instance, we only need to assign List and Get permissions.
Next, we need to find the right principal. Again, you can search by name or object id, and select it.
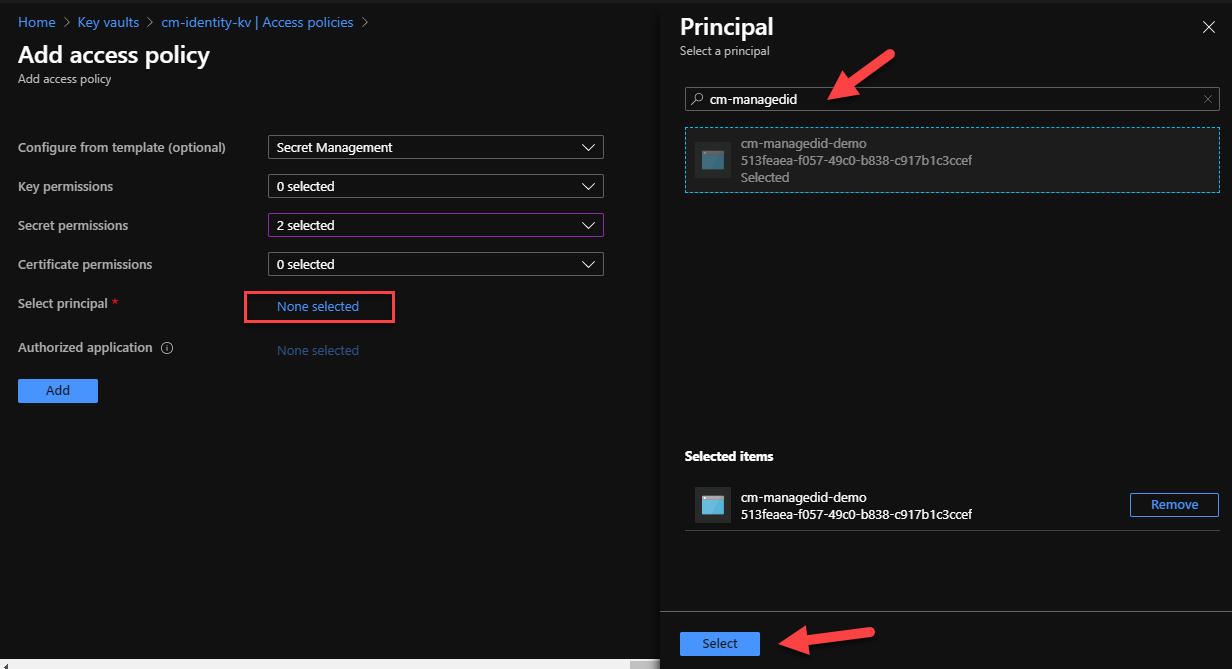
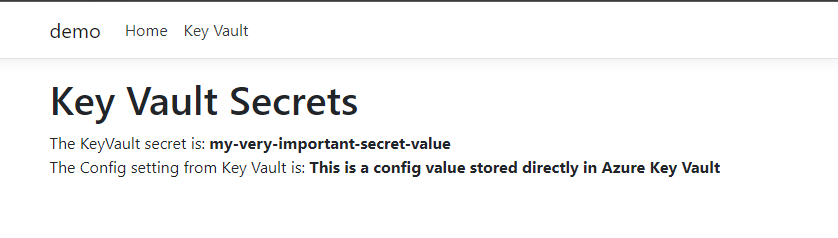
Back in the Access Policies tab, we should now be able to see our Managed Identity with its two Secrets Permissions. Make sure to press Save to persist the changes. Back to our Web App, we need to do a restart to ensure that the new permissions are picked up. Run the app and.... what a glorious sight!
This all works out of the box with no code changes and minor modifications to our Key Vault.
Using User Assigned Managed Identities
As we mentioned earlier Managed Identities come in two flavors. The default, system-assigned is created automatically for us. But these MSIs are bound to the resource and can't be reused. User defined MSIs, on the other hand, are not bound to any resources and can be reused across multiple ones. In addition, a resource can have multiple user-assigned MSIs! This means that if we want to use user-assigned MSIs, we need to do some code changes. More specifically, we need to configure the AzureServiceTokenProvider with the identity we want to use. You can find more details about Service-to-Service authentication with MSI in the docs.
First, we need to define a new parameter in our appsettings.json file. The new parameter, we'll name it UserDefinedId will be used to store the clientId of our user-defined MSI. If you need to find the client id, run the following command in the Azure CLI
az identity list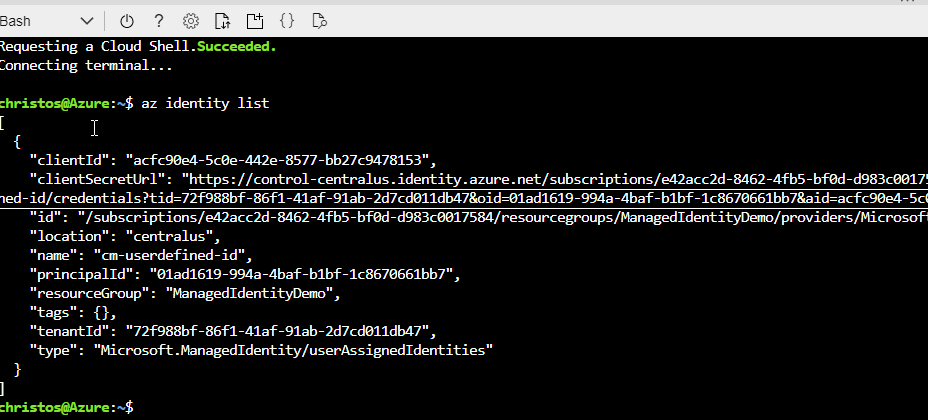
If you need to first create a new identity, you can run the following command
az identity create --name <any unique name> --resource-group <resourceGroupName>

You can't use the ClientId in development as the code is not running in the context of Azure and it will throw and exception. However, we can update the code to handle both scenarios :)
Open the Program.cs class and update the code with the following:
The code here does a few things. First, it checks to see if the app is going to use a user-assigned or a system-assigned MSI based on the value of the UserAssignedId parameter in the appsettings.json. If the value is empty, then we assume that the app is either running locally (you can't use user-assigned MSI in dev) or it's using a system-assigned MSI with the default constructor for the AzureServiceTokenProvider. If, however, the paramater value is set, then the code knows that we're using a user-assigned MSI and instantiates the AzureServiceTokenProvider with the appropriate connection string. This is code is clever enough to work it out but I'm sure there are other ways we can implement this
Back in the Azure Portal, in the Identity tab on our Web App, we need to configure the User Assigned MSI

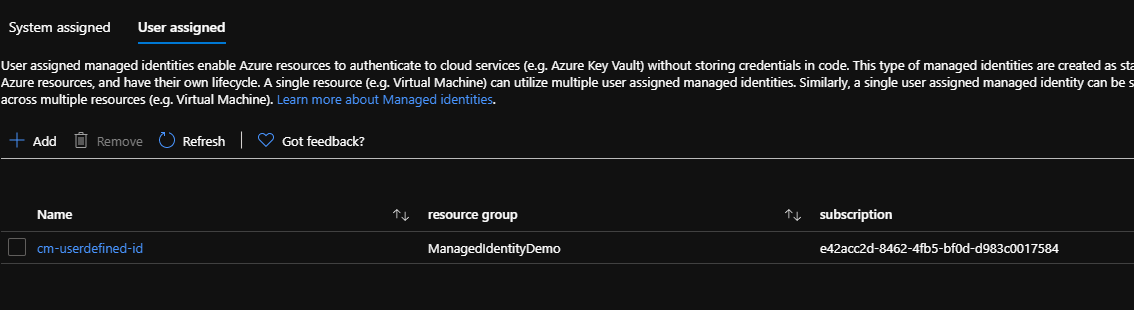
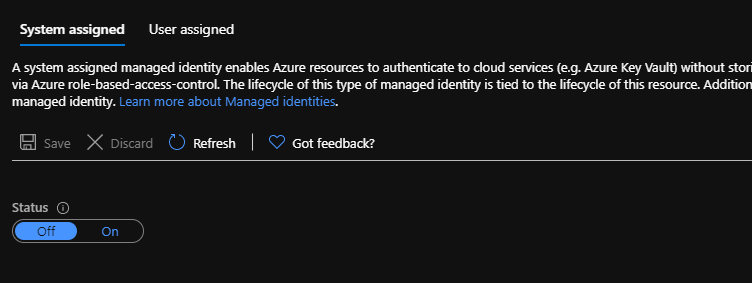
At this point, you also want to ensure that the System Assigned MSI is turned off
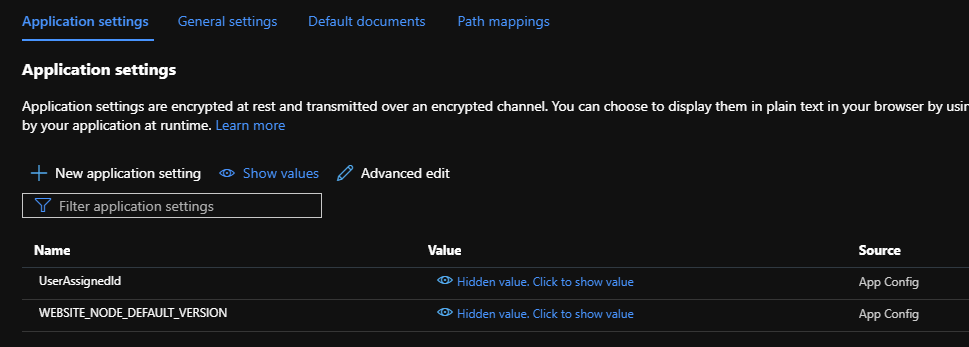
We also need to add a new App Setting for the UserAssignedId. In the Configuration tab on our Web App, we need to add a new Application Setting with:
- name: UserAssignedId
- Value: <The ClientID of our user-assigned identity>
Make sure to press Save to persist the changes. This will also restart the web app (for good measure, lol)
Finally, we need to ensure that our user-assignd MSI has the appropriate permissions to access our Key Vault. Remember that we only need to configure the minimum permissions (i.e GET and LIST on the Secrets) and save the changes.
We can now test our web app and check that everything is working as expected!
Summary
Managed Identities are an invaluable tool for helping you create more secure solutions by removing the need to store keys, secrets, passwords or anything else that can be used to compromize your infrastructure. And with MSI being designed is a way to support this end to end, from development to production, you should be making sure to use this wherever it's supported.
The repo with a working example is on GitHub and you can always reach out to me if you have any questions!