[TypeScript](http://www.typescriptlang.org/" target="_blank) is a new(ish), open source language that is a superset of JavaScript. TypeScript was designed to bring object-oriented features along with ES6 support. Any valid JavaScript is TypeScript and all TypeScript code compiles to nice, clean JavaScript. With ES6 (EcmaScript2015) officially ratified, TypeScript continues to offer great forward-compatibility with newly added features all the time and therefore, it remains a great language for developing JavaScript. This fantastic language now has a great companion: [Visual Studio(VS) Code](https://www.visualstudio.com/en-us/products/code-vs.aspx" target="_blank). VS Code is the new lightweight code editor from Microsoft and was in fact built with TypeScript! Consequently, it's only natural that they work great side-by-side.
I've been using VS Code since it was announced at //Build earlier in 2015 and it's my go-to editor outside Visual Studio. If the framework/language is supported then I use VS Code. There are [over 30!](https://code.visualstudio.com/docs/languages/overview" target="_blank) languages supported out of the box and this number will only grow. For me, the IDE really shows its strengths on web projects such as Node.js, ASP.NET 5 etc. You'll also be happy to know that it's cross-platform and offers the same, great experience on Mac OSx, Linux and Windows.
Today, I'll show you how easy it is to get started with VS Code and TypeScript. In the past, I've talked about [SublimeText and TypeScript](GHOST_URL/getting-started-with-typescript-and-sublime-text/" target="_blank") and, as promised, it's now Code's turn for some TLC and exposure.
Installing VS Code
To get VS Code, you'll need to head to the VS Code [website](https://www.visualstudio.com/en-us/products/code-vs.aspx" target="_blank") and click on the big, green "Download" button. Once the installation is complete (within a few minutes, it's lightweight, remember?), you're ready to start developing. I would suggest that you could use [ChocolateyNuget](https://chocolatey.org/" target="_blank) as an alternative download site, but unfortunately at the time of writing the supported version is too far behind. (I did request a refresh though)!
NOTE: if you've gone through multiple versions of TypeScript before, make sure your %PATH% (system variable) is updated to point to the latest installed version. Otherwise some things may not work.
Working with TypeScript
Even though JavaScript is fully supported, there's a little bit of work you need to do to add full TypeScript support to your project. Let's get going then:
First you need to create a project directory in your file system. This is where all the project files will go. E.g C:\projects\VSTest. Then we need to add a tsconfig.json file. This file is your TypeScript project file and contains your TypeScript project settings, compiler options etc. Go to File -> New File and click on Save or Ctrl+S. Save the new file as tsconfig.json. This file is your TypeScript project file (similar to a *.sln file in C#) that contains all the settings for compiling and managing your *.ts files. You find more about this file on the official [TypeScript repo documentation](https://github.com/Microsoft/TypeScript/wiki/tsconfig.json" target="_blank). Add an open-close bracket {} in order to get IntelliSense. As soon as you start typing you should be presented with the following option:

A standard configuration should look like this:
{
	"compilerOptions": {
        "target": "ES5",
        "noImplicitAny": true,
        "module":"commonjs",
        "removeComments": true,
        "preserveConstEnums": true,
        "out": "output/project.js",
        "sourceMap": true
    }
}
Now that we have a project file, we can start adding code files. Let's create our first TypeScript file. Go to File -> New File and save this file as hello-world.ts. Add some ts code:
class Startup {
	public static main():number{
		console.log('hello world');
		return 1;
	}
}
Nothing much here. A simple class that writes to the console and returns an integer value of "1".
Building and compiling
The kick off a build, type Ctrl+Shift+B. If this is the first time your are attempting to build the project, VS Code will prompt you to set up a Task Runner. Click the Configure Task Runner option to set up a config file.

The Task Runner uses the config file, which in effect instructs VS Code to use a specific executable with certain parameters to build your code. In this case, we are interested in tsc.exe which is the TypeScript compiler.
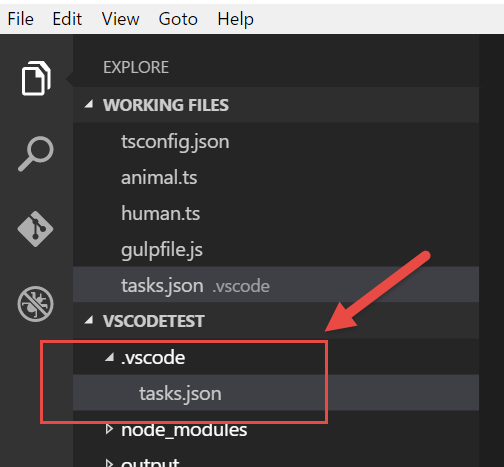
Once the process completes, you should be able to see a .settings folder with a task.json file below it.

Open the task.json file to edit it. Create a task configuration to instruct VS Code to execute tsc.exe with hello-world.ts as its argument as per the sample below:
{
    "version": "0.1.0",
    "command": "tsc",
    "showOutput": "silent",
    "args": ["hello-world.ts"],
    "problemMatcher": "$tsc"
}
Although this is fine, we want to take advantage of our tsconfig.json file to manage the build parameters. You can change the previous task to make it look like this:
{
    "version": "0.1.0",
    "command": "tsc",
    "isShellCommand": true,
    "args": ["-p", "."],
    "showOutput": "always",
    "problemMatcher": "$tsc"
}
Let's break down this task definition a bit:
- version: doesn't really matter
- command: which executable to call
- showOutput: [silent, always, never]
- isShellCommand: runs the
tsccommand in a shell (VS Code directly executing it) - args : explicitly call
tsc -pto compile all*.tsfiles using thetsconfig.jsonsettings [currently sitting at the root of the project. If callingtscfrom the command line, it would betsc -p <path to tsconfig.json> - problemMatcher: a string or array of strings based on the pre-defined problem matchers. No need to mess with this for now
Information on errors during development is important. This is the reason why I always set the showOuput value to "always". This changes the Output Window behavior to always come up during the build process. The available values below define how the output window behaves:
- silent: the output window is brought to front only if no problem matchers fire for the task. This is the default
- always: the output window is always brought to front
- never: The user must explicitly bring the output window to the using the View menu or the short cut Ctrl+Shift+U
At this stage, you can type Ctrl+Shift+B to start a build. This will find all *.ts files in the project and transpile them to *.js.
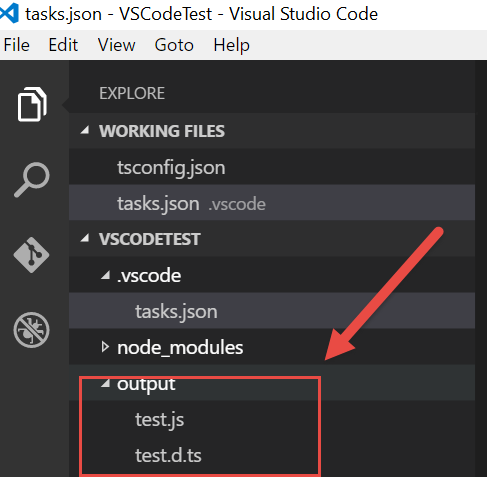
If you have defined an out parameter in tsconfig.json all the TypeScript files will be transpiled and a single .js file will be generated. If you omit this setting in tsconfig.json each TypeScript file will generate a corresponding JavaScript file. There's an option to choose explicit TypeScript files to transpile by configuring the tsconfig.json>files[] setting.
Success! You should now be able to see the following files in your project directory:

As you start adding more files and your project grows, make sure you include all the *.ts files you want to compile in your tsconfig.json file. This will ensure that all your code gets traspilled to JavaScript and merged into one file as per our configuration earlier.
Build Errors
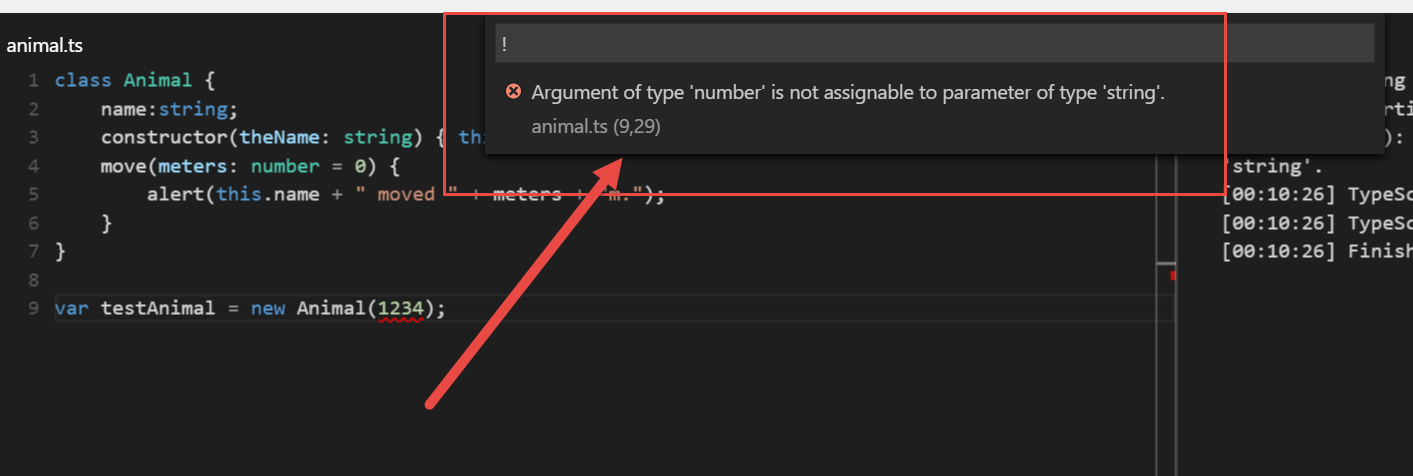
VS Code is really great at reporting errors. You get 2 error display types inside VS Code. The first one is directly in the code editor through IntelliSense. This is very similar to what you get in Visual Studio. An example is attached below:

The second error display can be found on the task bar notifications at the bottom, left-hand side:

Clicking on the error icon, you get a nice popup at the top of the window that tells you which line number and column is causing the specific error and the type/description of the error, as per below:

Summary
VS Code is excellent when working with TypeScript and it's only meant to get better. I hope this guide helps you get started with TypeScript and VS Code and, as always, let me know in the comments if you have any questions or problems.
Coming Up - VSCode and Gulp
On my next post I will discuss how to add Gulp to your project to perform various tasks such as compiling your *.ts files, uglifying and minifying your code, compiling less and sass etc, so stay tuned..
This is now live - here
Related Posts
- [Setting up a Gulp task with VS Code](GHOST_URL/setting-up-a-gulp-task-with-visual-studio-code/" target="_blank)
- [Visual Studio Code: getting insider builds](GHOST_URL/visual-studio-code-getting-insider-builds/" target="_blank)